Purchase orders
Make a purchase order from Low stock or from scratch, edit it, mark it sent, print it, receive the delivery in full or in part, or cancel it.
A purchase order (PO) is your list of what you are buying from one supplier. A9 Stockroom keeps it, works out the quantities, and adds the delivery to your stock when it arrives. It does not send anything to the supplier: you send the order yourself (see Mark a purchase order sent).
Purchase orders are part of the Pro plan. On Essentials the Purchasing screen shows a short note and a way to contact support, and Low stock has no Create PO button. See Your plan.
Owners and managers make, edit, send and cancel orders. Techs can open an order and receive a delivery against it. Viewers cannot open them.
What you'll need#
- The Pro plan, and the Owner or Manager role. (To receive a delivery you can be a Tech too.)
- Items with a supplier set, if you want Low stock to sort them into one order per supplier. See Suppliers.
- At least one folder at the location the order ships to, so the delivery has somewhere to go. You can choose it when you make the order or when the delivery arrives. A location you have never stocked has no folders yet, and Into folder is empty for it: add one first (see Folders). Switch to that location before you tap New folder.
Steps: create a purchase order from Low stock#
This is the fast way. Low stock already knows what is under its minimum and how many to order to get back up.
- Open Settings, then Low stock. On a desktop, choose Low stock in the left menu.
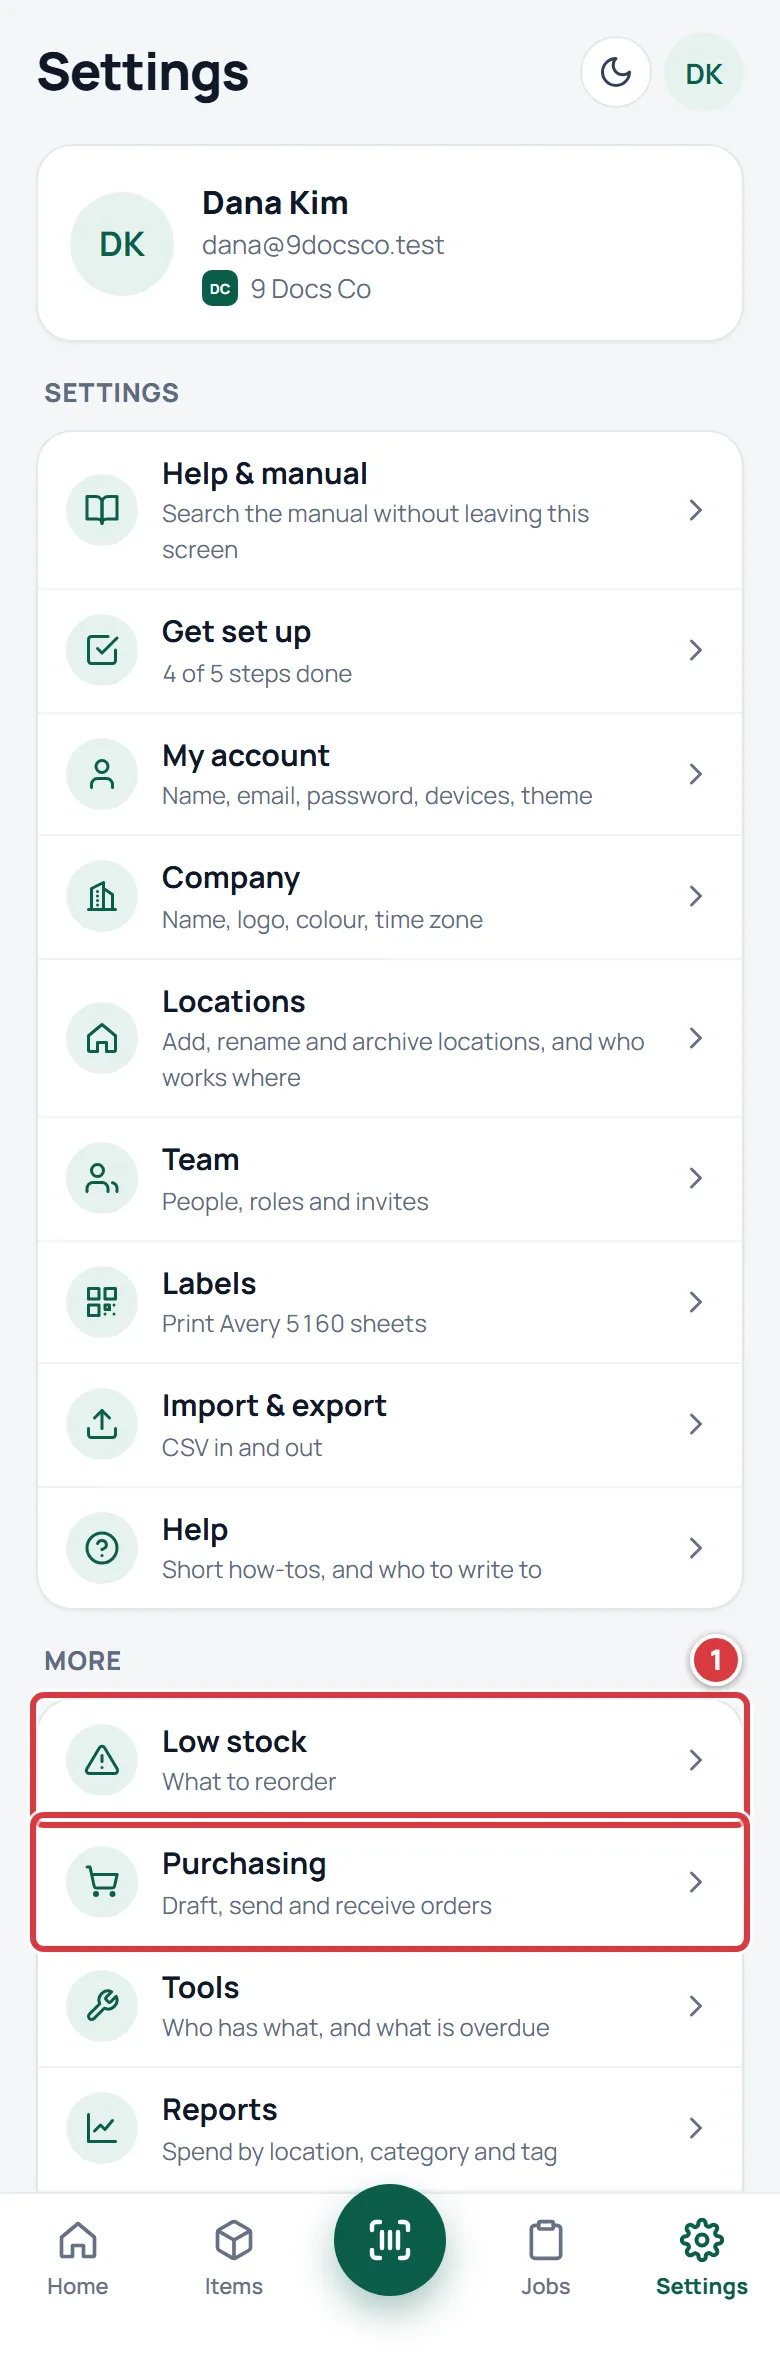
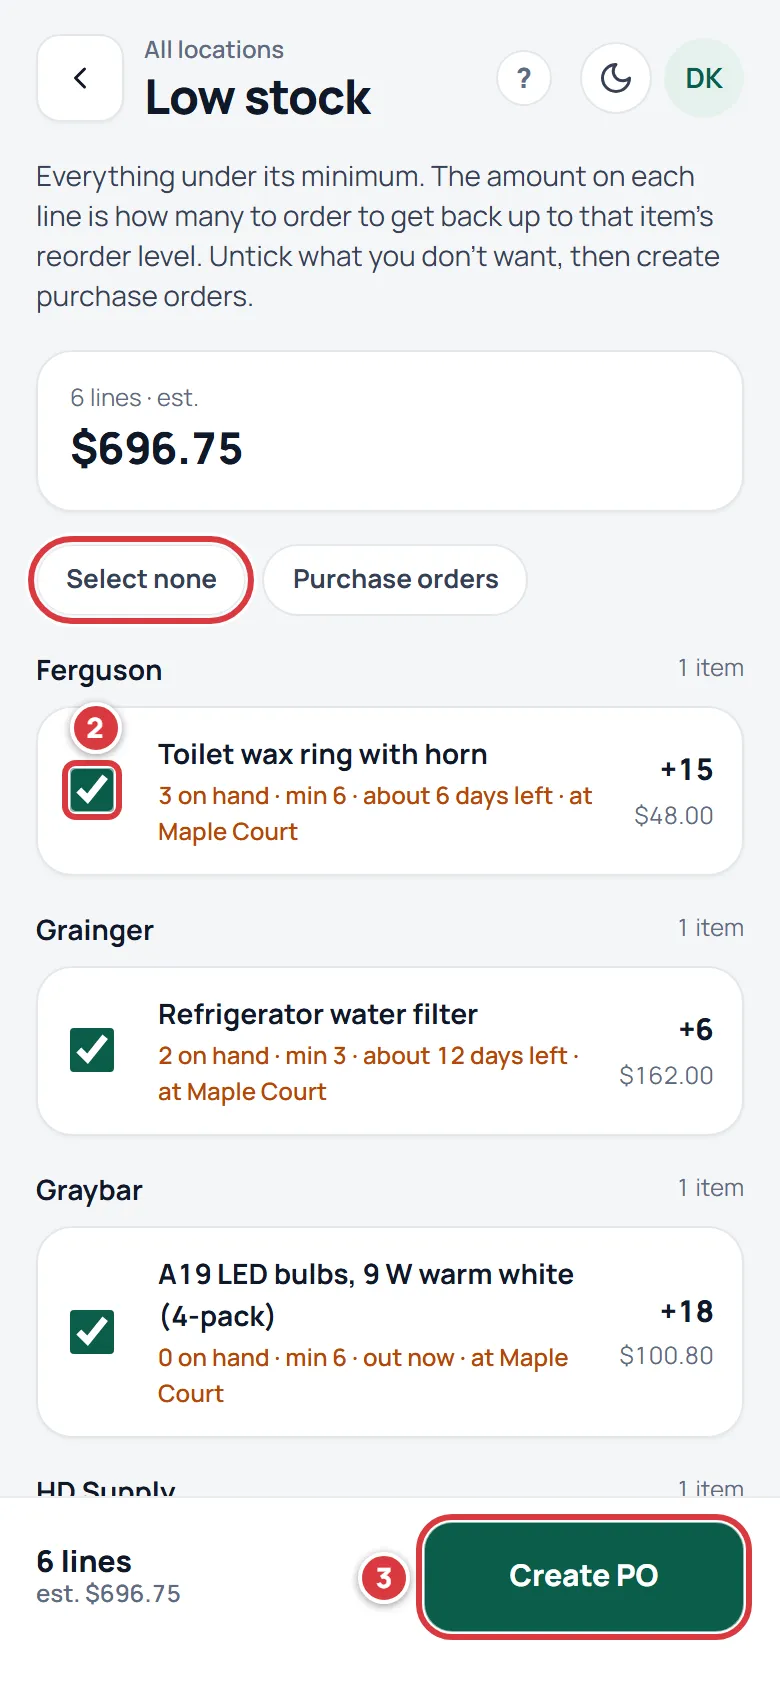
- Look at the list. Every item under its minimum is ticked, grouped by supplier. Untick the lines you do not want to order now. Select none unticks everything, then tick the few you want. Select all ticks them again.
- Tap Create PO. It shows how many lines you picked and the estimated cost.
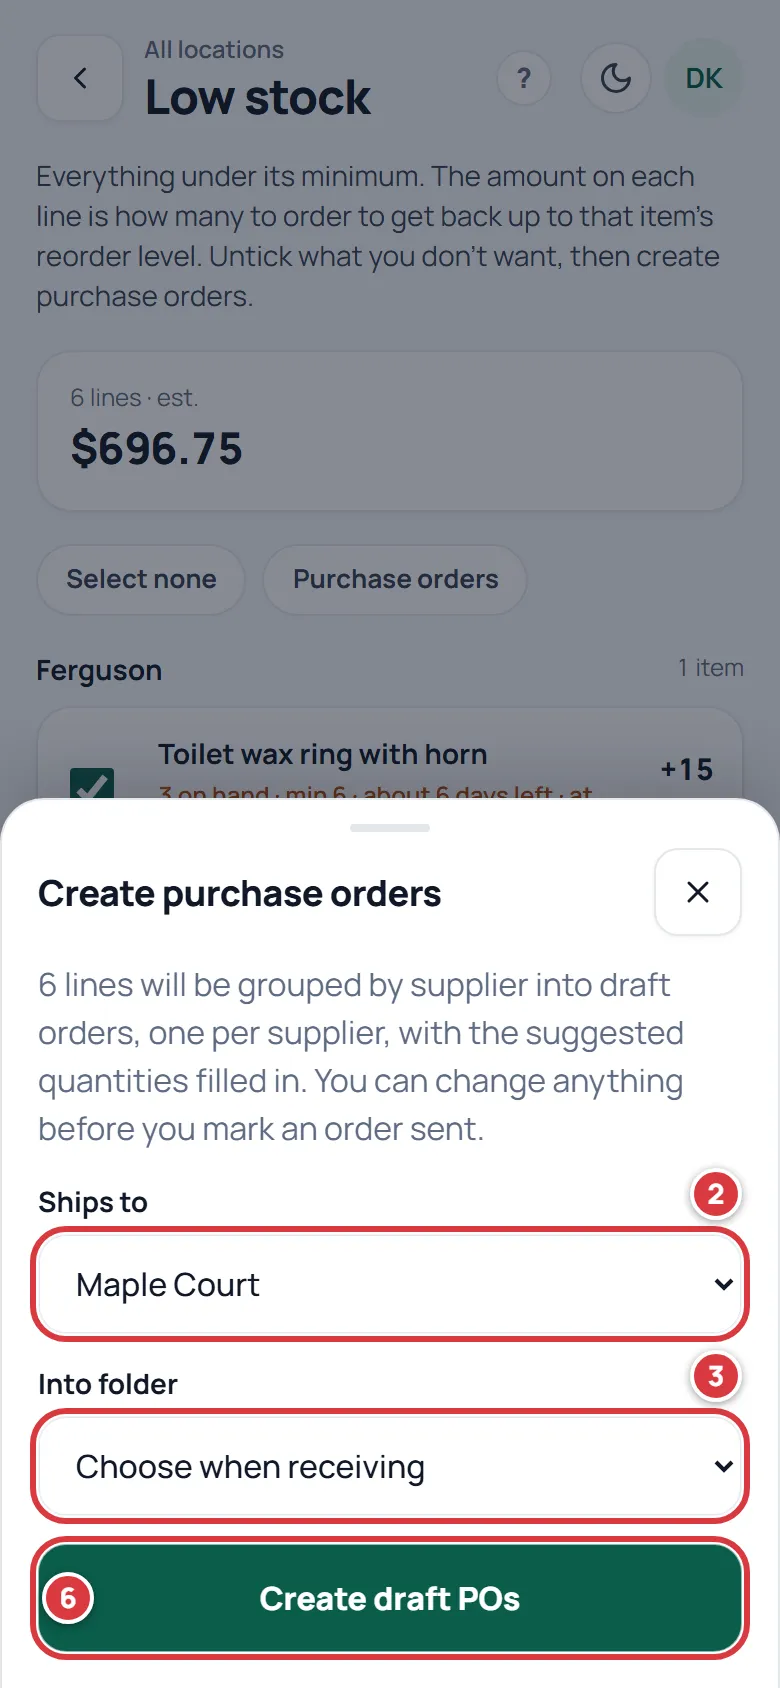
- If your company has more than one location, check Ships to. It starts as the location you are looking at.
- Choose Into folder: the folder the delivery will go into. Leave it on Choose when receiving if you do not know yet.
- Tap Create draft POs.
You get one draft order for each supplier. Lines for items with no supplier go together on an order with no supplier set. The quantity on each line is how many it takes to get back up to the item's reorder level at that location. See Minimums and reordering.
If you made one order, it opens. If you made several, Purchasing opens on Draft with a note such as "5 draft purchase orders created, one per supplier." Nothing has gone to a supplier yet. Open each draft, change what you need (Edit a draft), then mark it sent.
Watch it done#
Read what this video shows
- Open Low stock as a manager.
- Tap Select none, then tick one line, the toilet wax ring.
- Tap Create PO.
- In Into folder, choose Bin P-03, then tap Create draft POs.
- The draft order opens. Tap Mark sent.
- The Receive panel appears. Scroll to it and tap Receive.
- A message says "Received 1 line."
Steps: start a purchase order from Purchasing#
Use this when you are not working from Low stock: a one-off buy, or an order for something that is not low yet.
- Open Settings, then Purchasing. On a desktop, choose Purchasing in the left menu.
- Tap New PO. On a desktop the button is called New purchase order.
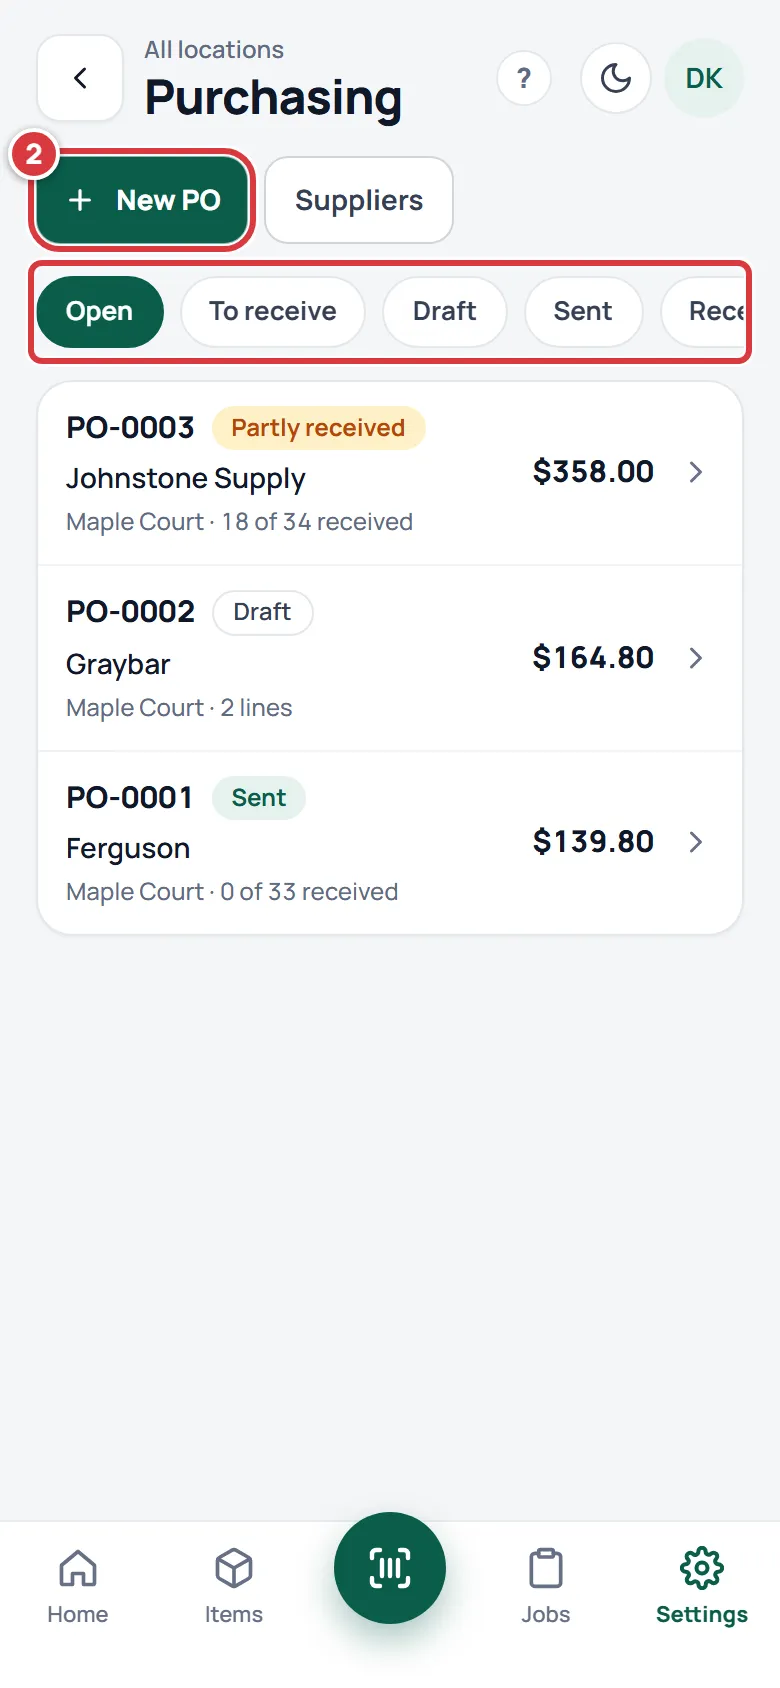
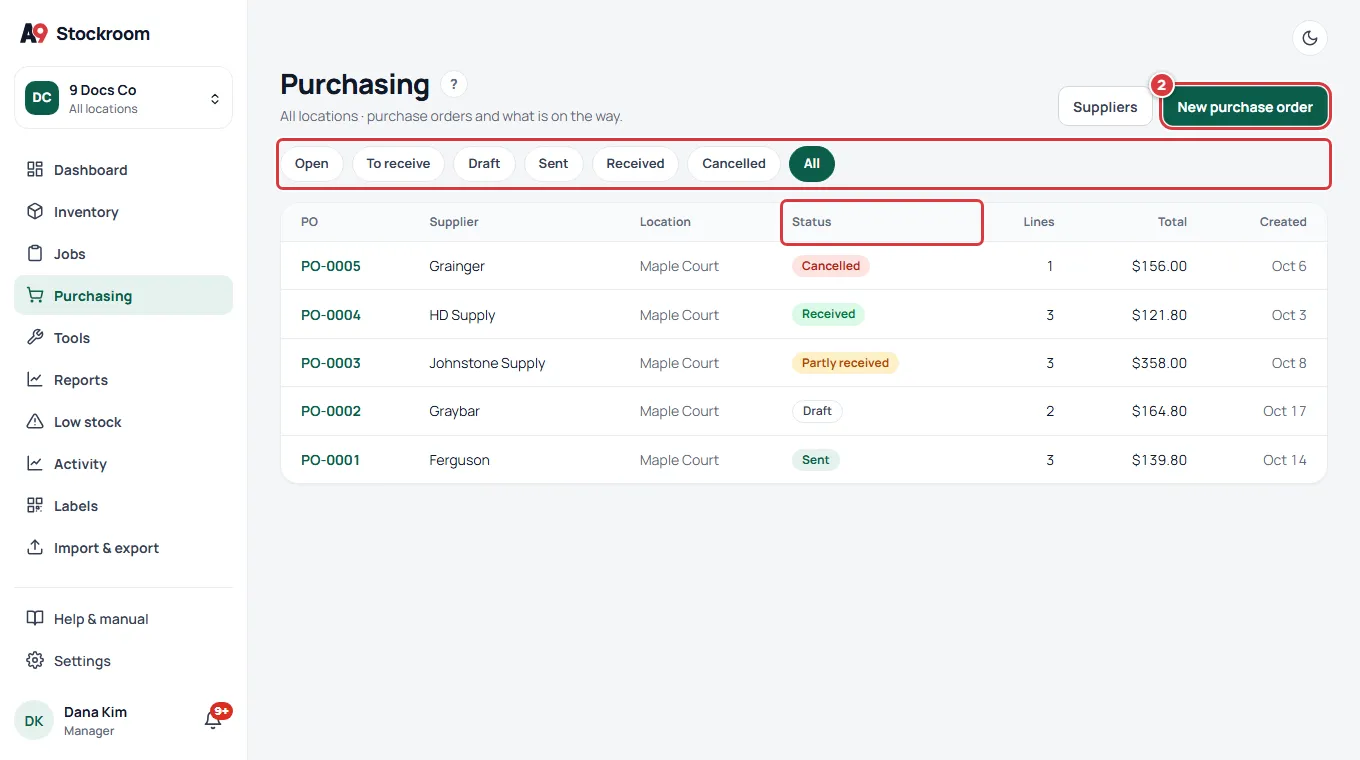
An empty draft opens with a new PO number. It ships to the location you are looking at, or to your first location. Fill it in with the next section.
Steps: edit a draft purchase order#
Only a draft can be changed. These steps are the same whether the draft came from Low stock or from New PO.
- Choose the Supplier. Archived suppliers do not appear, and you can add new ones under Suppliers. The supplier's name, account number, email and phone print on the order.
- If you have more than one location, choose Ships to. Changing it clears Into folder, because folders belong to one location.
- Choose Into folder, or leave Choose when receiving.
- Type anything the supplier or the person receiving should know in Notes, such as delivery instructions or an account note.
- Change a line's Quantity. It must be a whole number, 1 or more.
- Change a line's Unit cost if the price is different today. It starts at the item's own cost. Changing it here changes this order only, not the item.
- To add a line, type in Add an item (name, SKU or part number), then tap the item. Adding an item that is already on the order adds 1 to its quantity. Tap the x on a line to remove it.
- Tap Save changes.
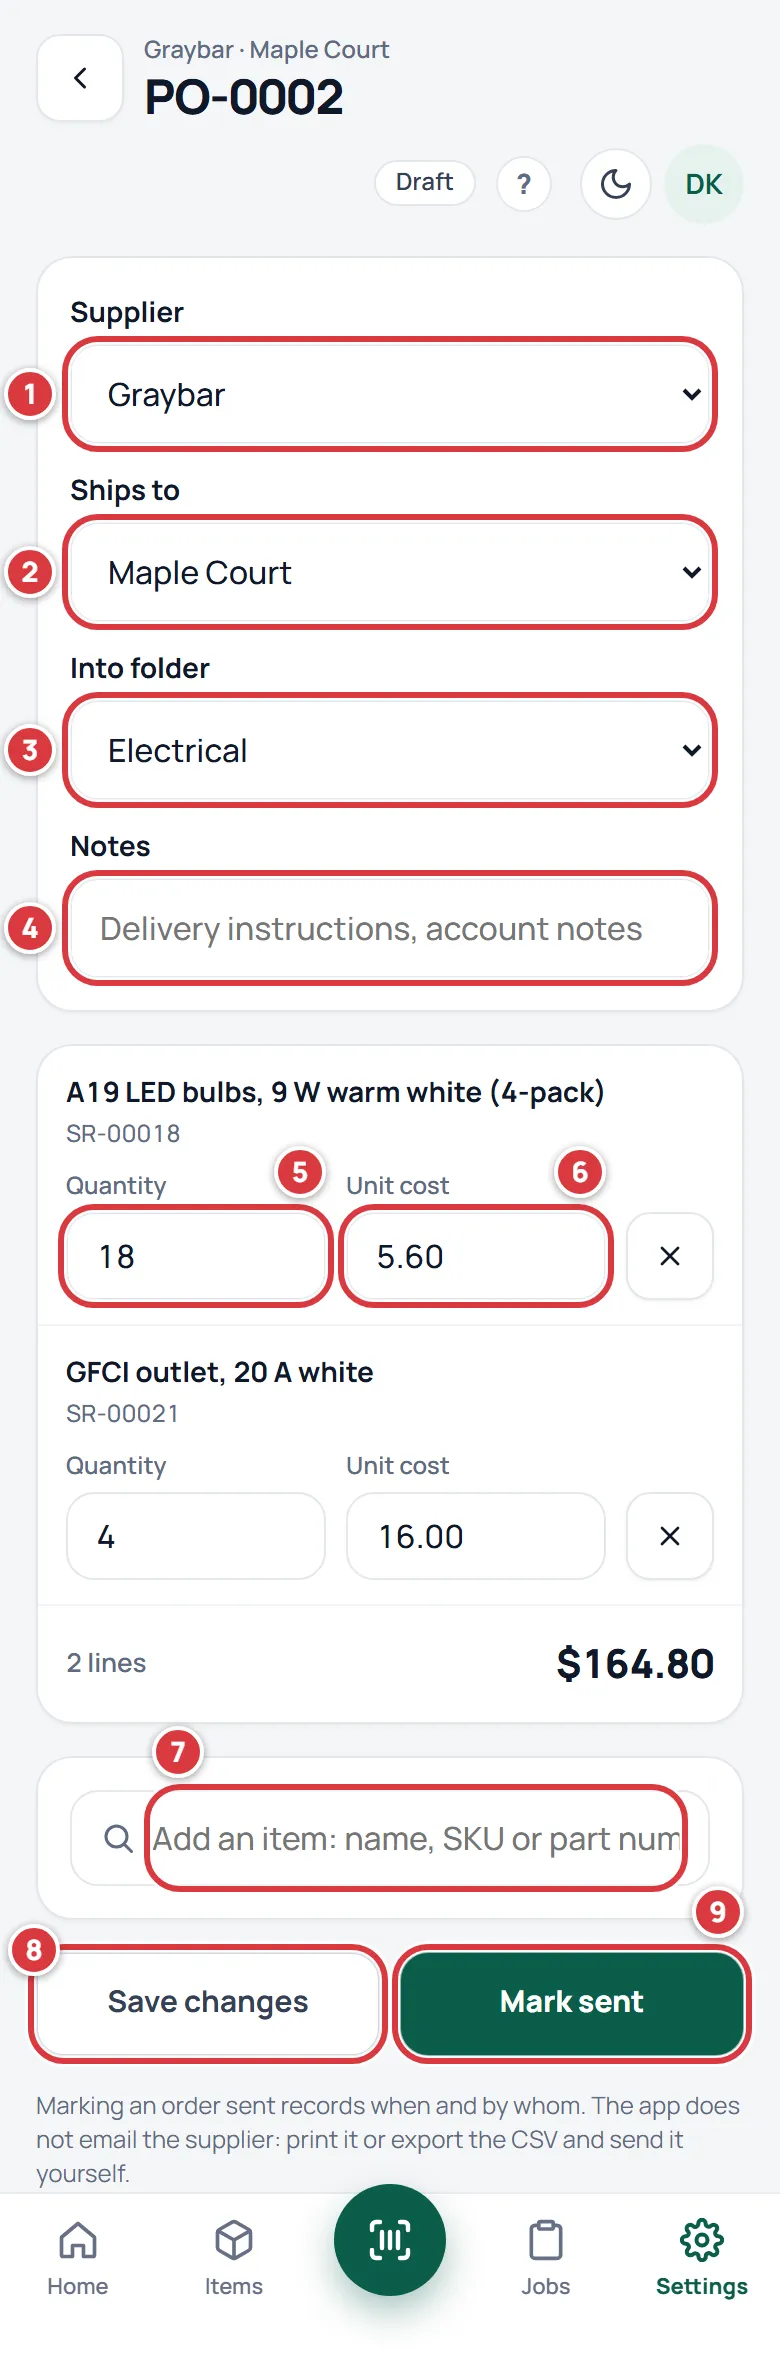
You can also tap Mark sent straight away: it saves your changes first.
Steps: mark a purchase order sent#
- Open the draft. Check the supplier, quantities and costs.
- Tap Mark sent (marked 9 in the picture above).
- Now send the order to the supplier yourself: print it or save it as a PDF, or export the CSV, and email it or give it to them (Print or export a purchase order).
What Mark sent does, and what it does not#
- It changes the status to Sent and records the date and who did it.
- It locks the supplier, location, lines, quantities and costs. There is no way back to a draft.
- It makes the order ready to receive.
- It does not email, text or otherwise send anything to the supplier. A9 Stockroom never contacts your supplier.
- It cannot be used on an order with no lines.
If you marked the wrong order sent, and nothing has been received, cancel it and make a new one.
Steps: print or export a purchase order#
- Open the order from Purchasing.
- Scroll below the lines. Tap Print for a clean one-page view, or Export CSV to download the lines for a spreadsheet.
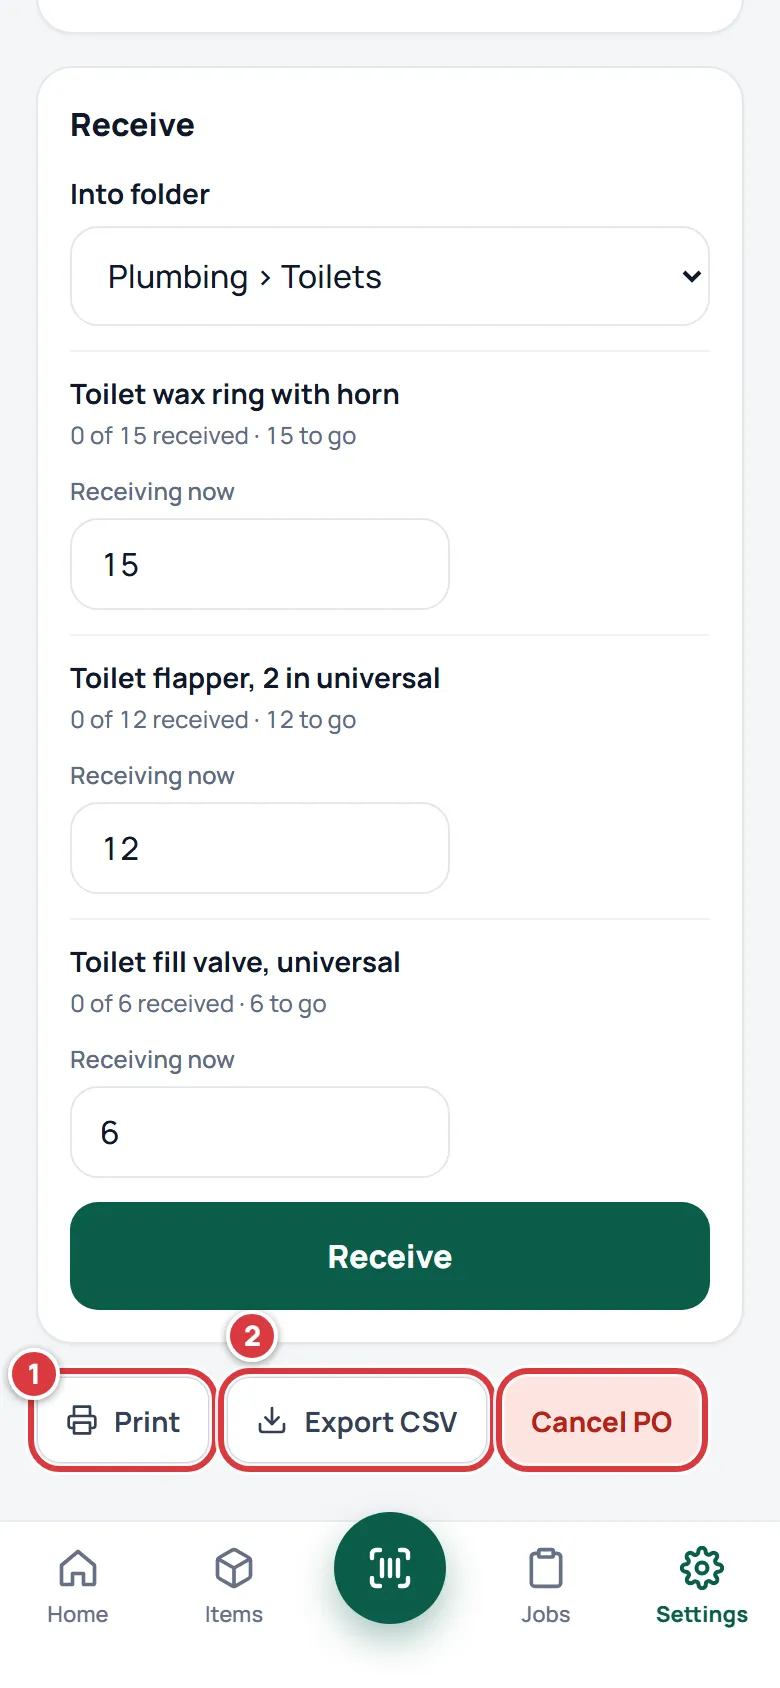
- On the print view, tap Print. In your browser's print window, choose a printer, or choose Save as PDF to attach it to an email. Tap Back to the order to go back.
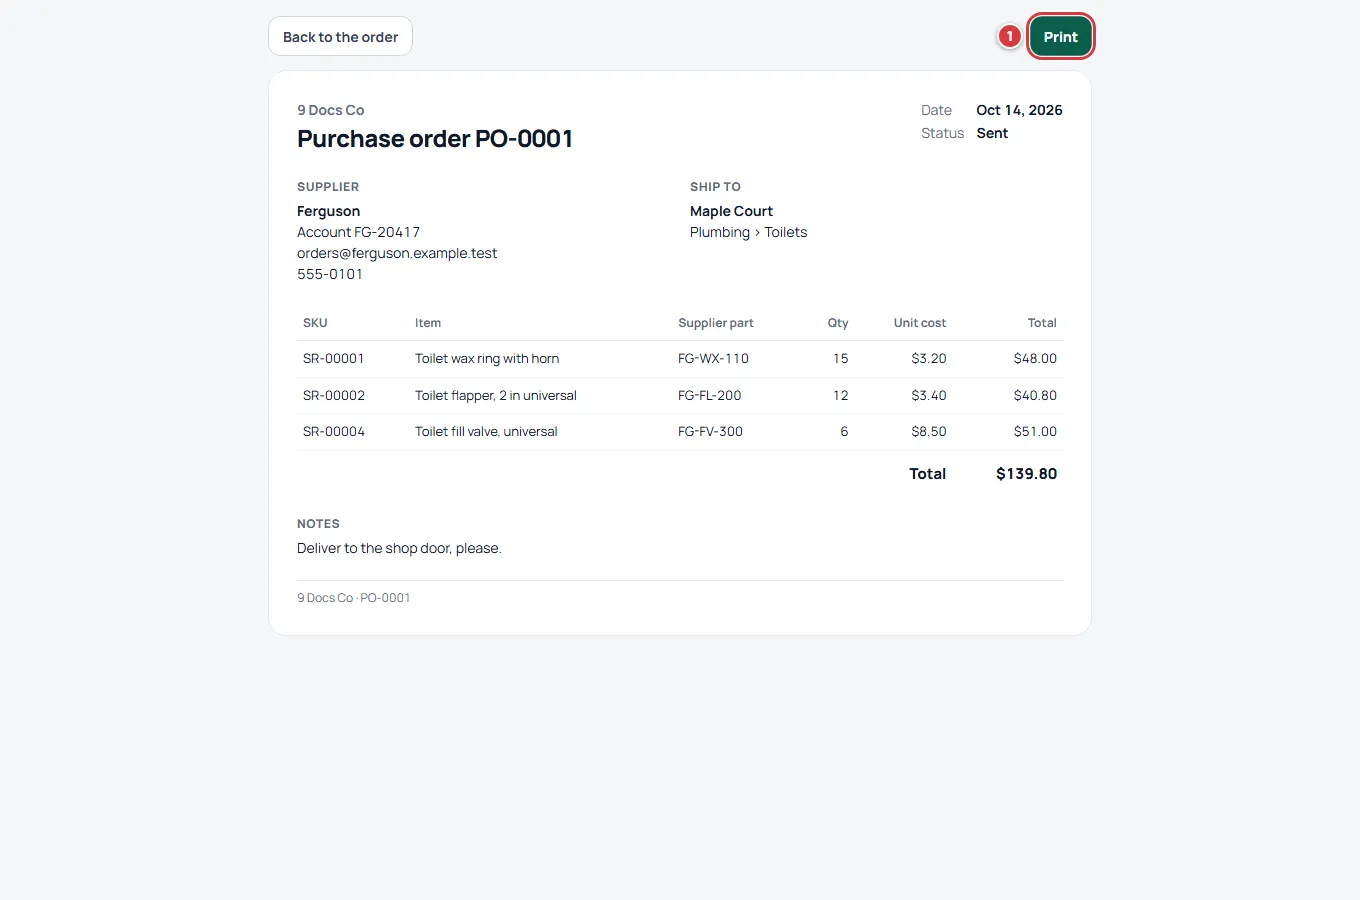
Only the order prints: the banner, the menus and the buttons stay off the paper. The printed order shows your company name and logo, the PO number, the date (the date it was sent, or created if it is still a draft), the status, the supplier with their account number, email and phone, where it ships, every line with SKU, supplier part, quantity, unit cost and total, the order total, and your notes. The CSV has the same lines, with the quantity received so far.
Both Print and Export CSV work on an order in any status.
Steps: receive a purchase order#
Managers, owners and techs can do this. A tech only sees orders that ship to a location they work at. Receiving needs a signal: it is not saved for later like a take or a count, so wait until you are back online. See Working without signal.
- Open Settings, then Purchasing. Techs start on To receive, which lists sent and partly received orders. Tap the order.
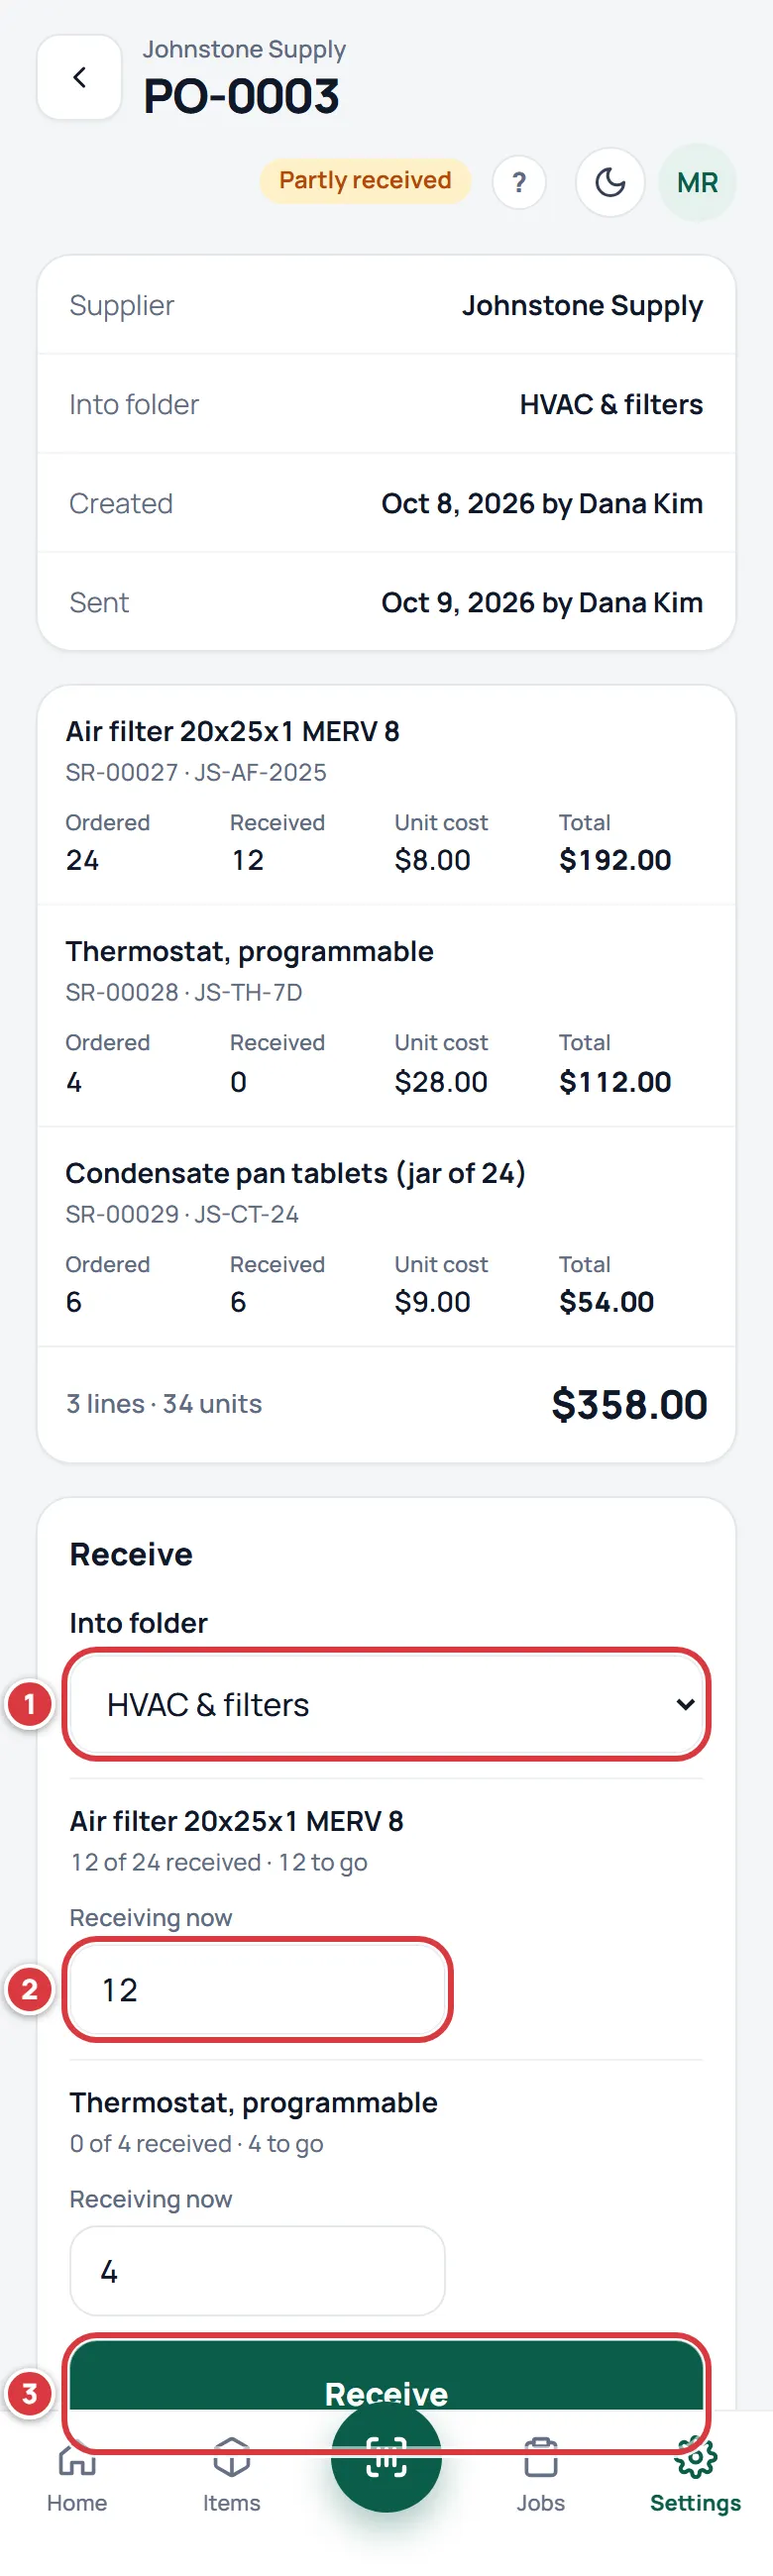
- In the Receive panel, check Into folder. It starts as the order's folder. If the order has none, you must choose one.
- For each line, Receiving now starts at how many are still to come. Change it to what really arrived. Set it to 0 for a line that did not come.
- Tap Receive.
Receive in full or in part#
- Receive everything: leave the numbers as they are and tap Receive. The order becomes Received.
- Receive part: lower the numbers, or set some to 0, and tap Receive. The order becomes Partly received. The lines that came are added to stock now. Open the order again when the rest arrives, and the Receive panel starts at what is still to come. Pick Into folder again each time: if the order did not name a folder, the panel does not remember your last choice.
- If more arrived than you ordered, type the real number. Each line counts as complete when it has at least the amount ordered.
Each received line adds stock to the folder you chose, and shows in Activity as a receive, one line for each time you tapped Receive. The PO number is in the Note column of the CSV you get from Export CSV on Activity; the Activity screen itself does not show it. Activity only lists the location you have on show. See Activity and history. The person who made the order and the managers get a notification, "PO-0003 partly received" or "PO-0003 received", but not the person who tapped Receive: if you made the order and received it yourself, your bell stays quiet. Tapping Receive twice, for instance after a bad connection, does not add stock twice: the second tap says "Already received."
For stock that arrives without an order, see Receiving stock.
Steps: cancel a purchase order#
- Open the order. Only a draft or a sent order that has had nothing received can be cancelled.
- Tap Cancel PO, beside Print and Export CSV.
- In the sheet, tap Cancel this PO. Tap Keep it if you changed your mind.
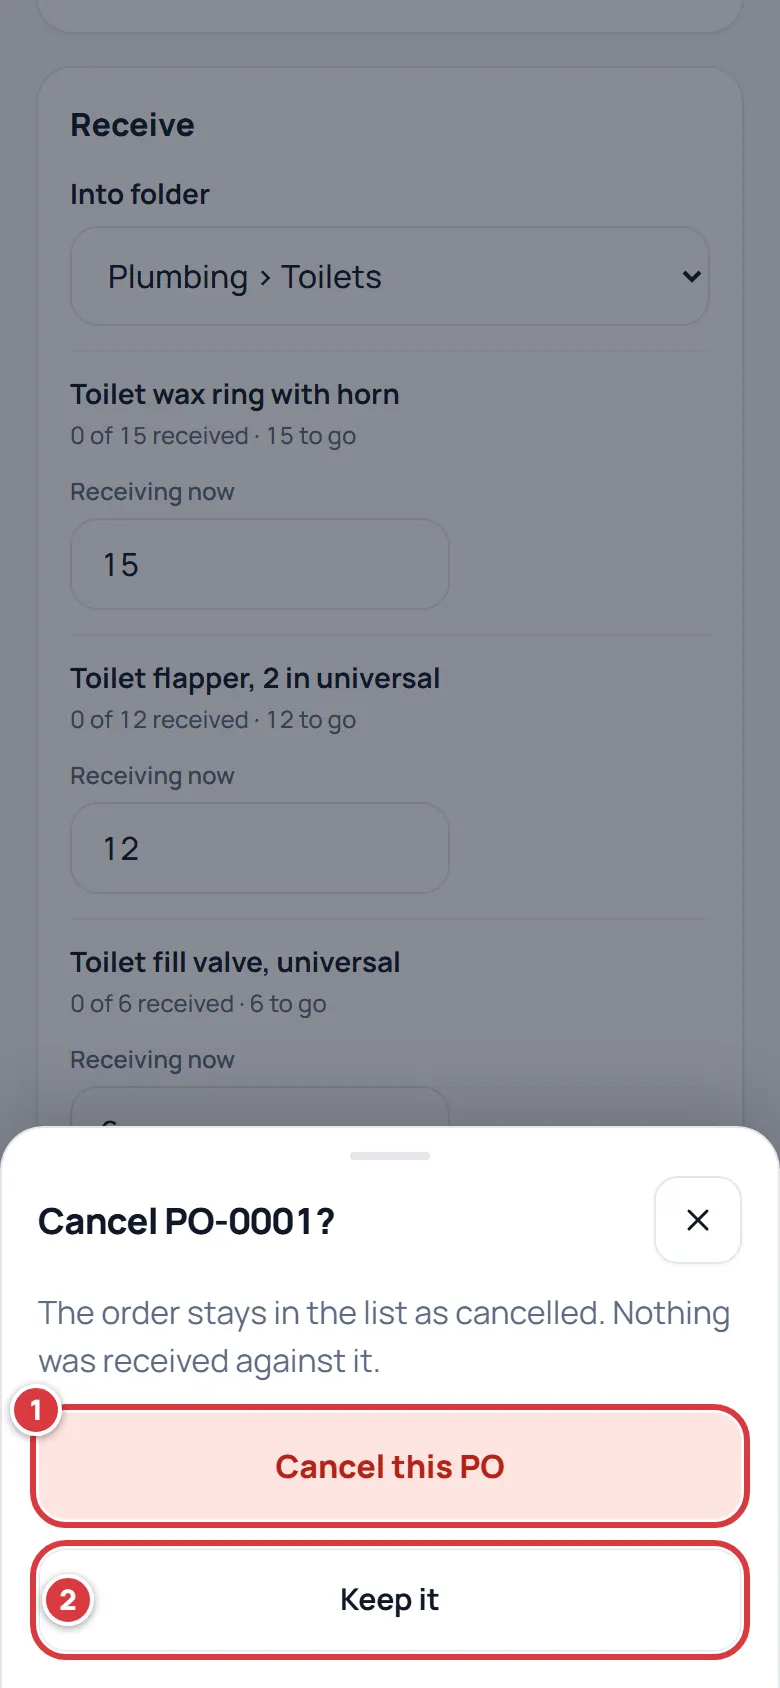
A cancelled order stays in the list as Cancelled, with a note of the date. It keeps its number, cannot be reopened, and does not touch your stock. To order the same things again, make a new order.
What you'll see#
- After Create draft POs: a draft with your suppliers, folder and suggested quantities, and a total.
- After Mark sent: the status pill changes to Sent, a Sent line shows the date and your name, the lines lock, and the message "PO-0001 marked sent." appears.
- After Receive: a message says "Received 3 lines." The lines show how many came, the pill changes to Partly received or Received, and the stock is in the folder.
- After Cancel this PO: a message says "PO-0001 cancelled.", and a notice at the top of the order shows the date.
PO numbers#
Every company has its own count. The first order is PO-0001, the next PO-0002, and so on. A number is given when the order is created, never changes, and is never reused, even if you cancel the order or never send it. Two companies can both have a PO-0001.
Statuses, and what each one allows#
| Status | What it means | What you can do |
|---|---|---|
| Draft | Made, not sent. | Managers edit everything, tap Mark sent, or cancel. Print and export. Nothing can be received yet. |
| Sent | Marked sent, nothing received. | Receive in full or in part, cancel, print and export. The lines are locked. |
| Partly received | Some lines or some of their quantity came. | Receive the rest, print and export. It cannot be cancelled. |
| Received | Every line has what was ordered. | Print and export. The order is closed. |
| Cancelled | Cancelled before anything came. | Print and export. The order is closed. |
The list has seven filters. Open is drafts, sent and partly received orders. To receive is sent and partly received orders. Draft, Sent, Received and Cancelled each show only that status. All shows everything. Managers start on Open, techs on To receive.
Describe this diagram
A purchase order starts as a draft that you can edit freely. Mark sent makes it Sent and locks it. Receiving some makes it Partly received, and receiving the rest makes it Received. A draft or a sent order with nothing received can be cancelled. Mark sent only records the date and who did it; it does not email the supplier.
If it didn't work#
There is no Create PO button on Low stock#
On Essentials a note says purchase orders are part of the Pro plan. Techs and viewers see the list but cannot make orders. If you are an owner or manager on Pro, check that you are on Low stock and that something is under its minimum.
Create PO is greyed out#
Nothing is ticked. Tap Select all, or tick a line.
Mark sent is greyed out, or says "Add at least one line first."#
The order has no lines. Use Add an item to add one.
"Each line needs a whole quantity of 1 or more and a cost."#
Fix the line it names: no decimals in Quantity, and Unit cost cannot be empty.
I cannot change the supplier, lines or location#
The order has been sent. Only a draft can be edited. Cancel it if nothing has been received, and make a new one.
Receive is greyed out, or says "Choose the folder this delivery goes into."#
Pick a folder under Into folder. Every received line needs a place to go.
If the list only says Choose a folder and has nothing under it, the location the order ships to has no folders yet. Switch to that location (click the company and location name at the top of the left menu), add a folder there (Folders), then open the order again. A folder at another location will not do.
It says "Couldn't reach the server. Try again."#
Receiving, like everything on purchase orders, needs a signal. Move to where there is coverage and tap Receive again.
I cannot cancel an order that is partly received#
That is by design: stock has already been added. There is no way to close an order short. Leave it open, or make a new order for what is still needed. If a number is wrong, fix the stock itself with a count. See Counting stock.
The stock did not go up#
Open the item and look at its history for a receive with the PO number. Check the folder: stock goes into the folder you chose, at the order's location. If you chose the wrong folder, move the stock. See Moving stock.
The order is not in the list#
Check the filter chips: a Received or Cancelled order does not show under Open. Choose All. A tech only sees orders for locations they work at.
The supplier does not get the order#
The app does not send it. Print it, save it as a PDF or export the CSV, and send that.