Jobs
Start a job for a work order, charge the parts you take to it, see what it cost and what to bill back, then close it.
A job is a work order, a purchase order or any task you want parts charged to. Start one when the work order comes in. While it is open, every part you take is added to it. When the work is done, close it. You can see every part and what it cost.
What you'll need#
- A tech, manager or owner role. A viewer can look at jobs but can't start one.
- The work order's reference, like WO-4471. Any short reference works.
- A phone with A9 Stockroom open. Starting a job, taking stock and closing a job all work with no signal; they send themselves when the signal is back. See Working without signal.
Steps#
Start a job#
- Tap Jobs at the bottom of the screen. On a desktop, click Jobs in the sidebar.
- Tap Start job.
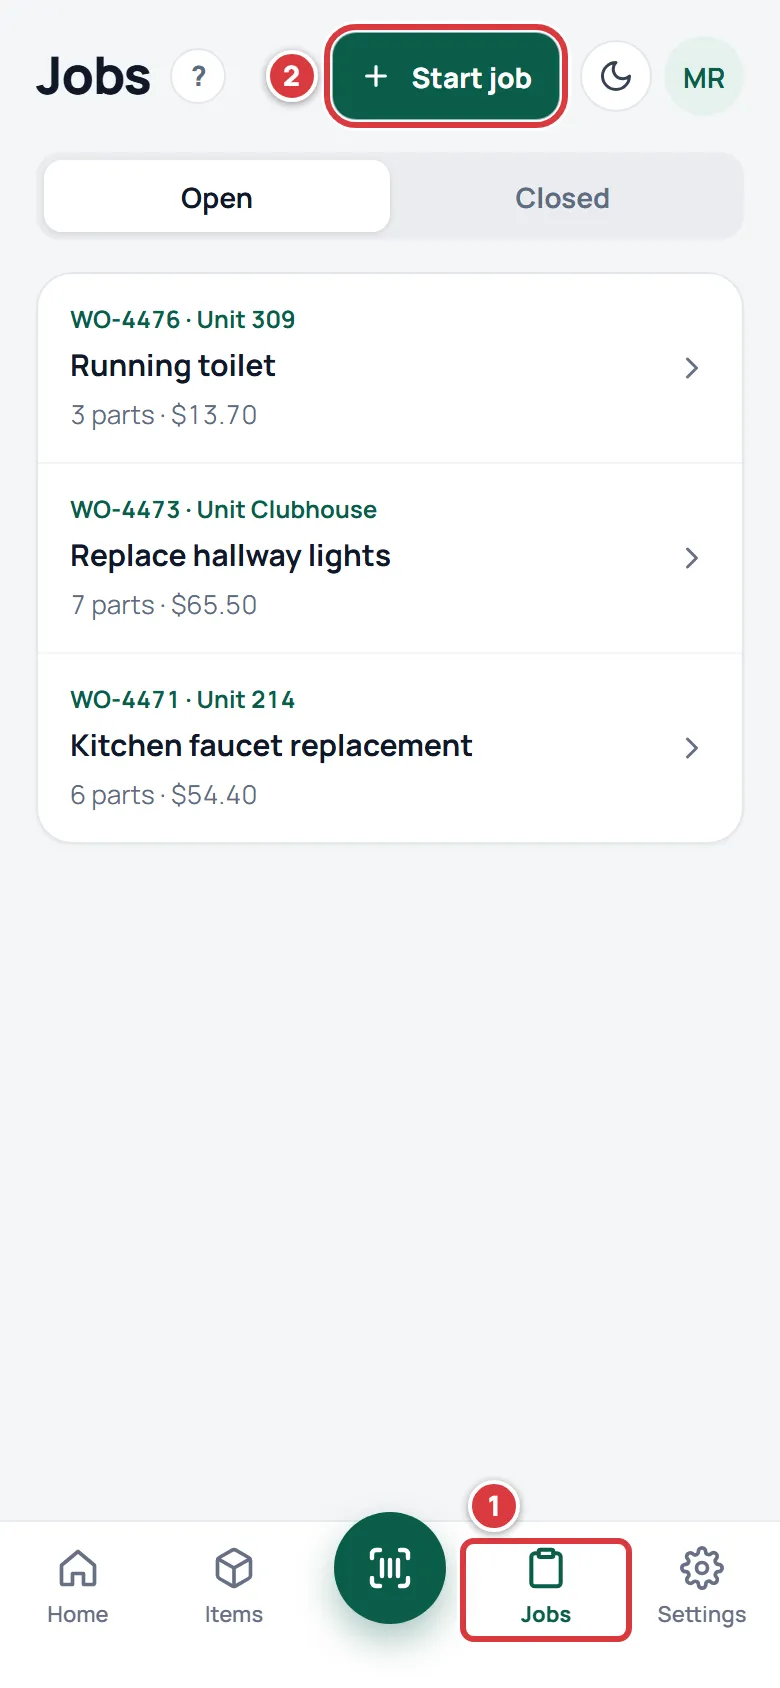
- Pick the kind: Work order, PO or Other. A work order is the usual one. If you also see Unit turn and a Unit box, see Unit turns; for a work order, leave Unit empty.
- Type the Reference. This is the only field you must fill in.
- Type what the work is in What's the job?, for example "Kitchen faucet replacement".
- Under Working out of, pick the folder you will take parts from. A truck is a good choice. Or leave No folder.
- Tap Start job.
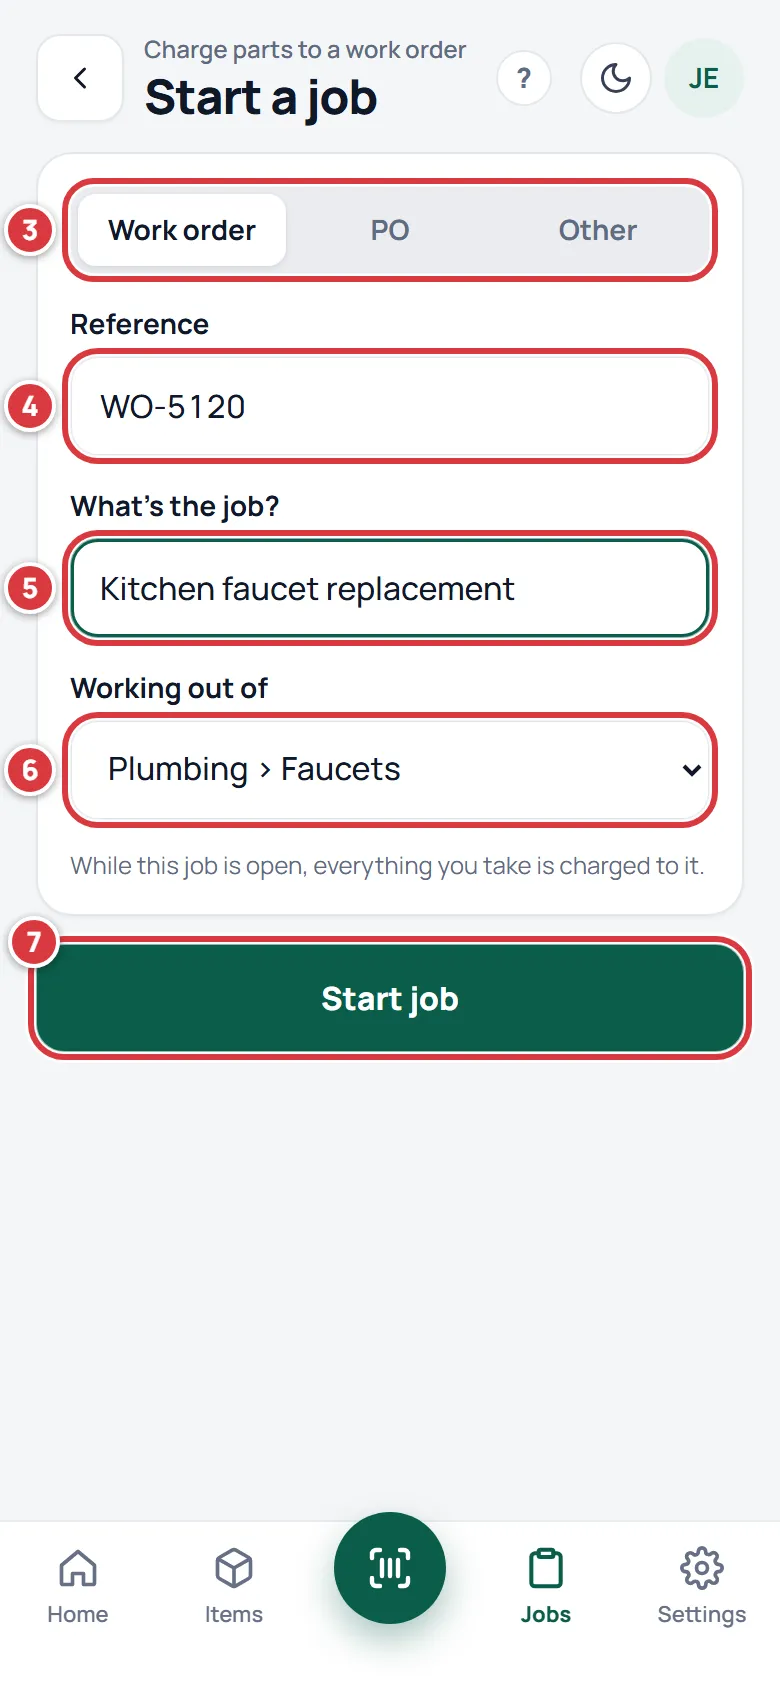
The job opens. From now on, the scanner charges everything you take to it.
Add stock to a job#
You add stock to a job by taking it. As long as the job is open and you started it, Take charges the job.
- Open the job and tap Scan more. You can also tap Scan at the bottom of any screen.
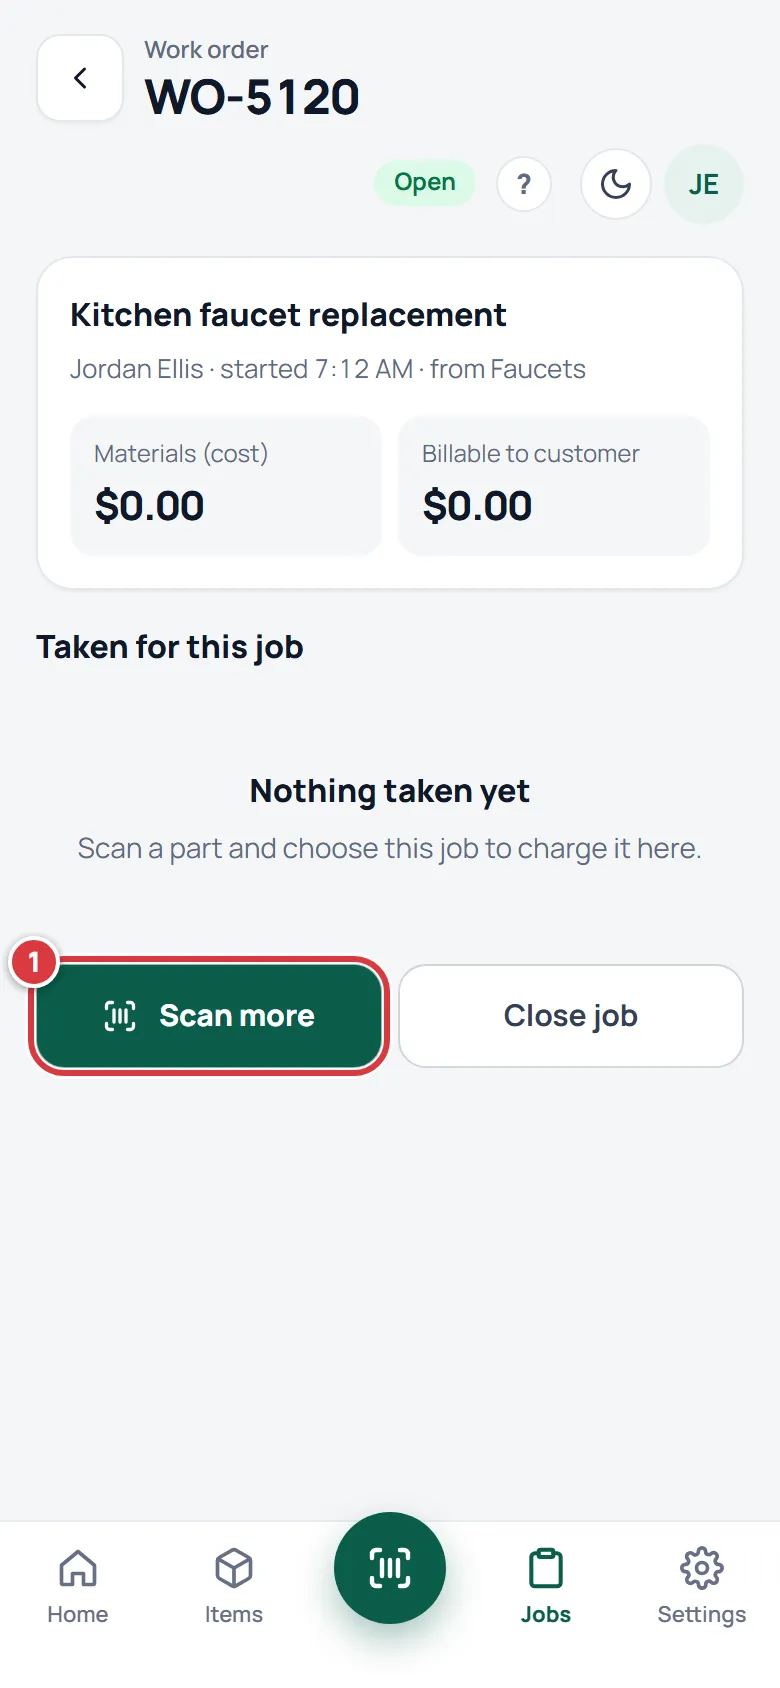
- Look at the chip at the top of the scanner. It shows the job you are charging. Aim the camera at the item's label or barcode.
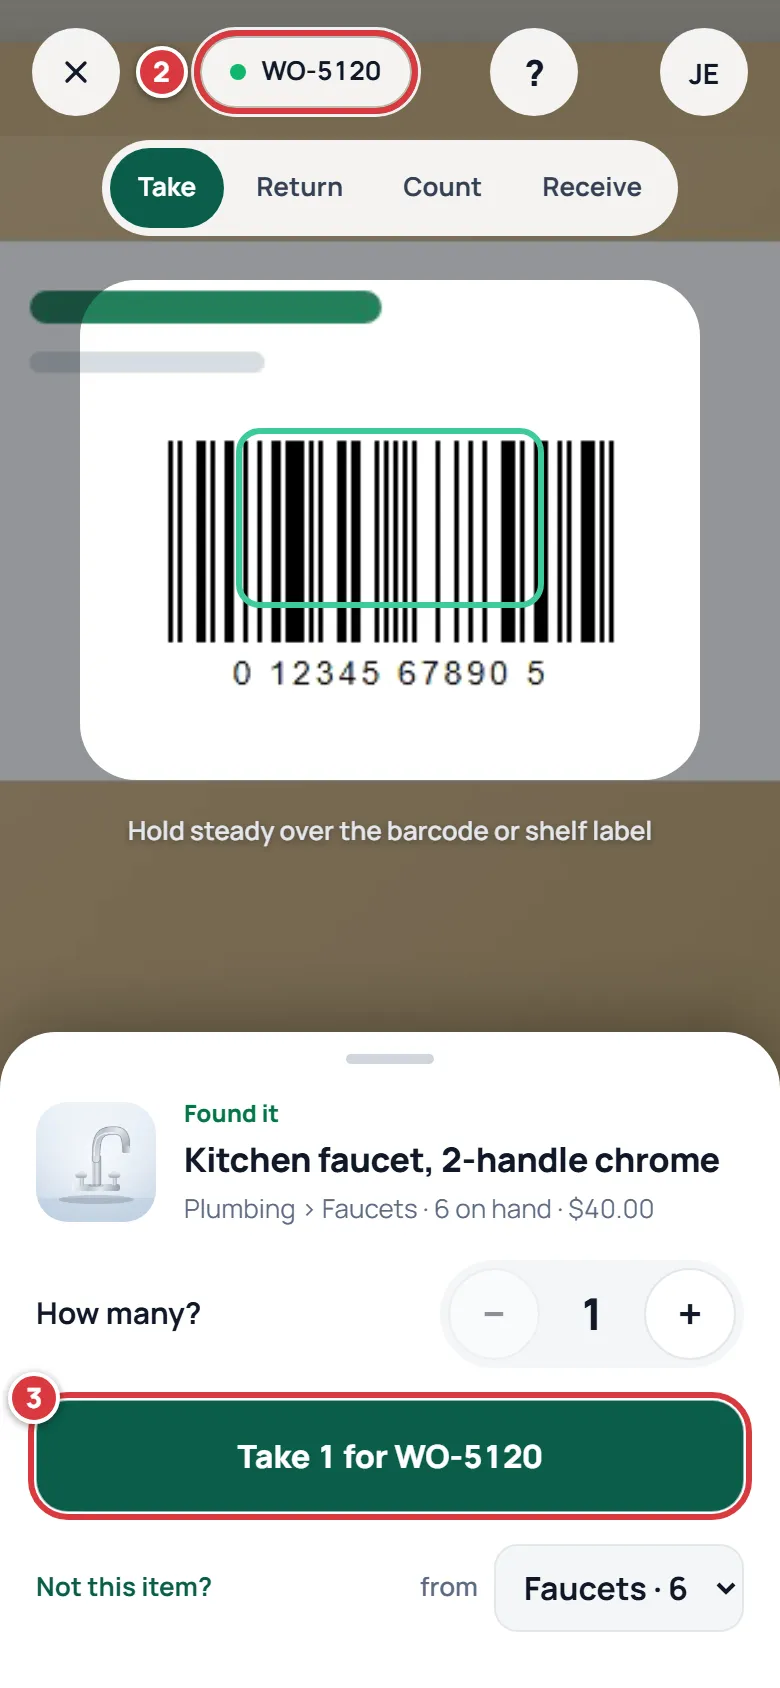
- When the sheet slides up, check How many? and tap the big button. It names the job, for example "Take 1 for WO-5120".
Take a part for a different job#
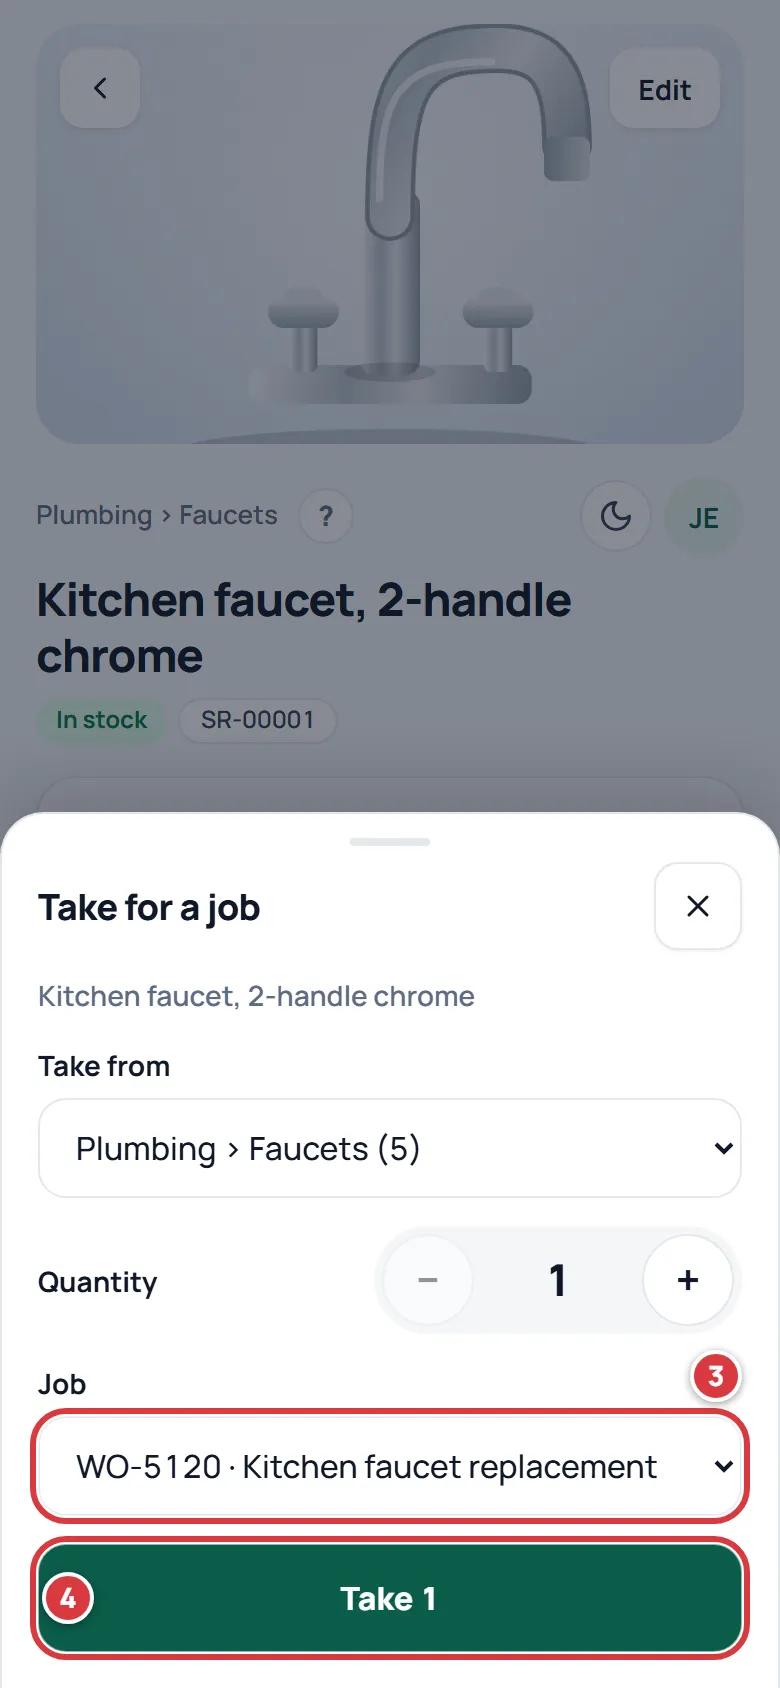
Use the item screen when you want to charge a job that is not your active one, or none at all.
- Open the item. Find it with Items or scan it.
- Tap Take for a job.
- Pick the job in Job. The choices are every open job, or No job.
- Check Quantity, then tap Take.
To put a part back on the shelf and take it off the job's bill, tap Return on the item screen and pick the same job in Job. A return made in the scanner does not know about the job, so the job keeps the part on its bill. See Returning stock.
See the parts and the cost#
- Tap Jobs, then tap the job.
- Read Materials (cost). It is what the parts cost you.
- Read the Billable to box. It is what you can bill back for the same parts.
- Under Taken for this job, see each part, how many, and what they cost. Tap a part to open its item.
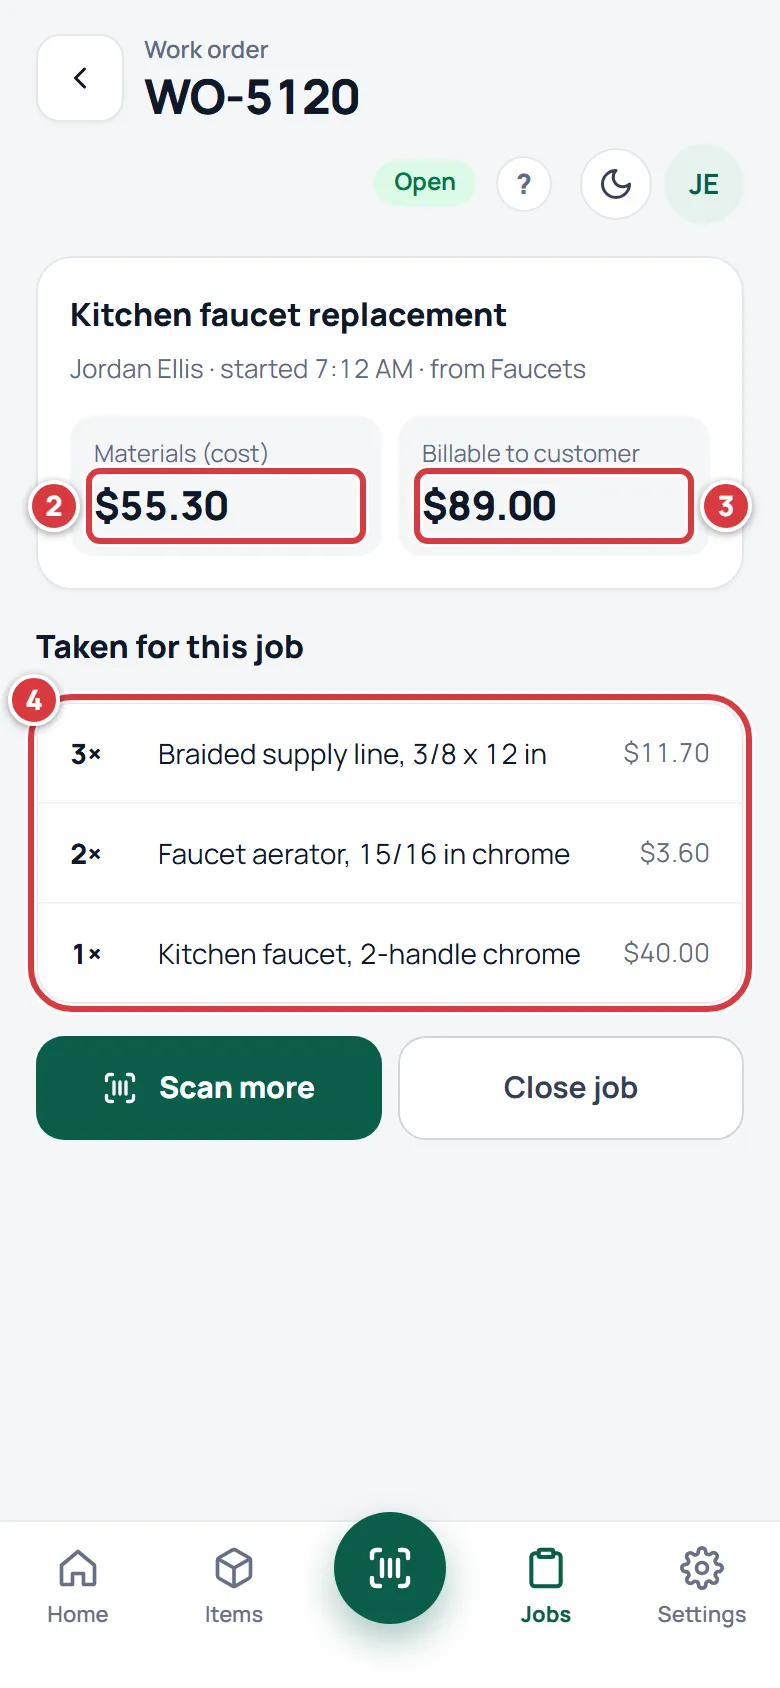
Returns come off. A part you took and put back does not count.
The Open jobs list on Home, and the Open tab on the Jobs screen, show every open job with its part count and cost. Closed shows finished ones.
Find out which job a part was charged to#
Before you tap Take, the chip at the top of the scanner and the big button both name the job, for example "Take 1 for WO-4471". Afterwards:
- Open the item and tap History. Each take and return made for a job shows the job's reference.
- Or tap Jobs, tap the job, and read Taken for this job. It lists every part charged to that job, with how many and what they cost.
If it is the wrong job, see "I took a part for the wrong job" at the end of this page.
Close a job#
- Open the job.
- Tap Close job.
- A sheet asks "Close WO-5120?". Tap Close job again.
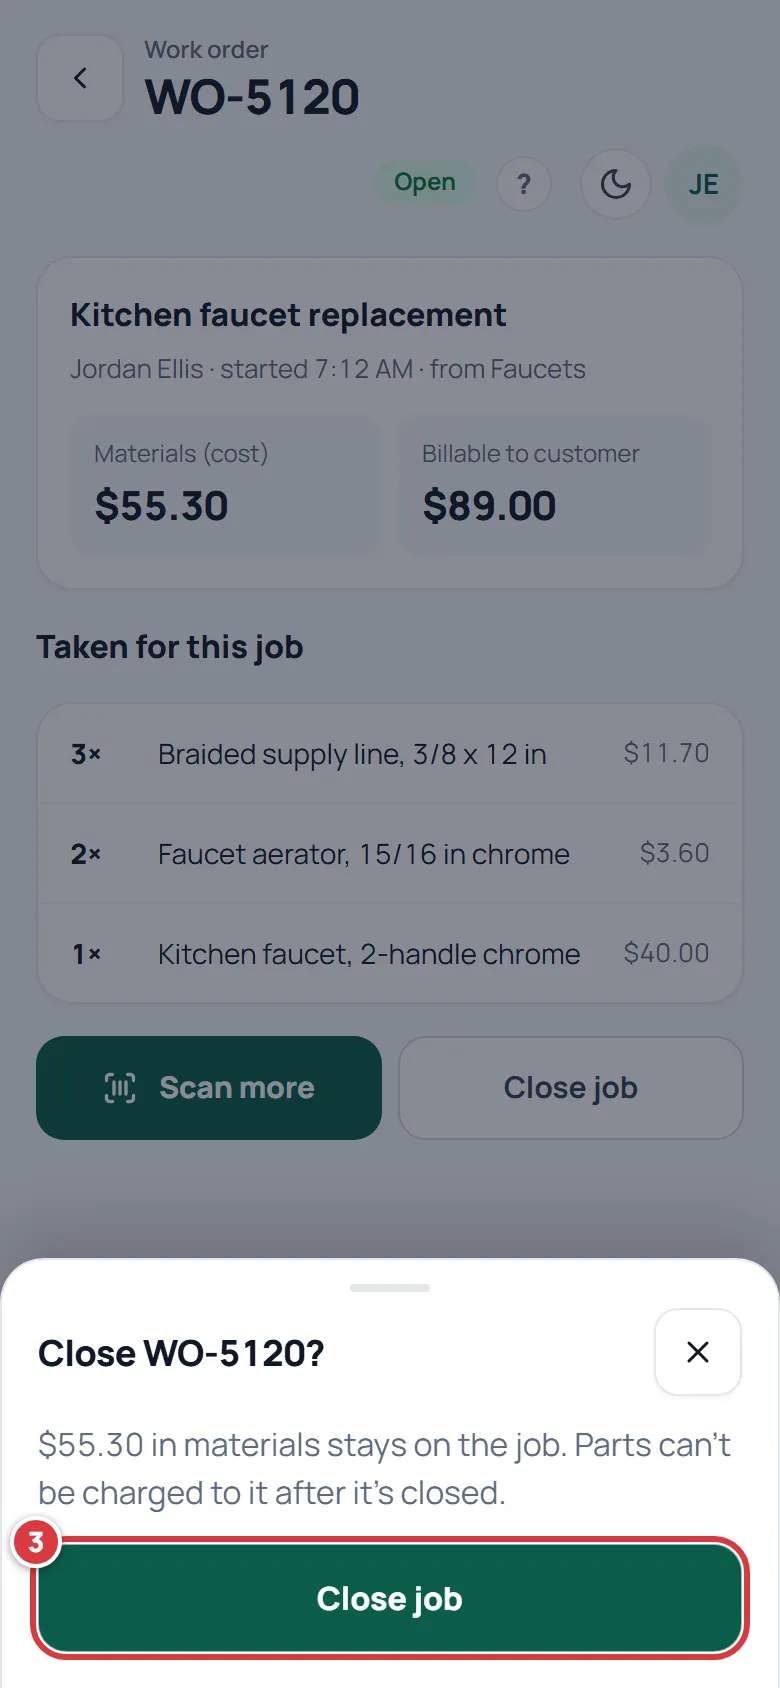
A closed job takes no more parts. Its cost and billable total stay as they were.
Reopen a closed job#
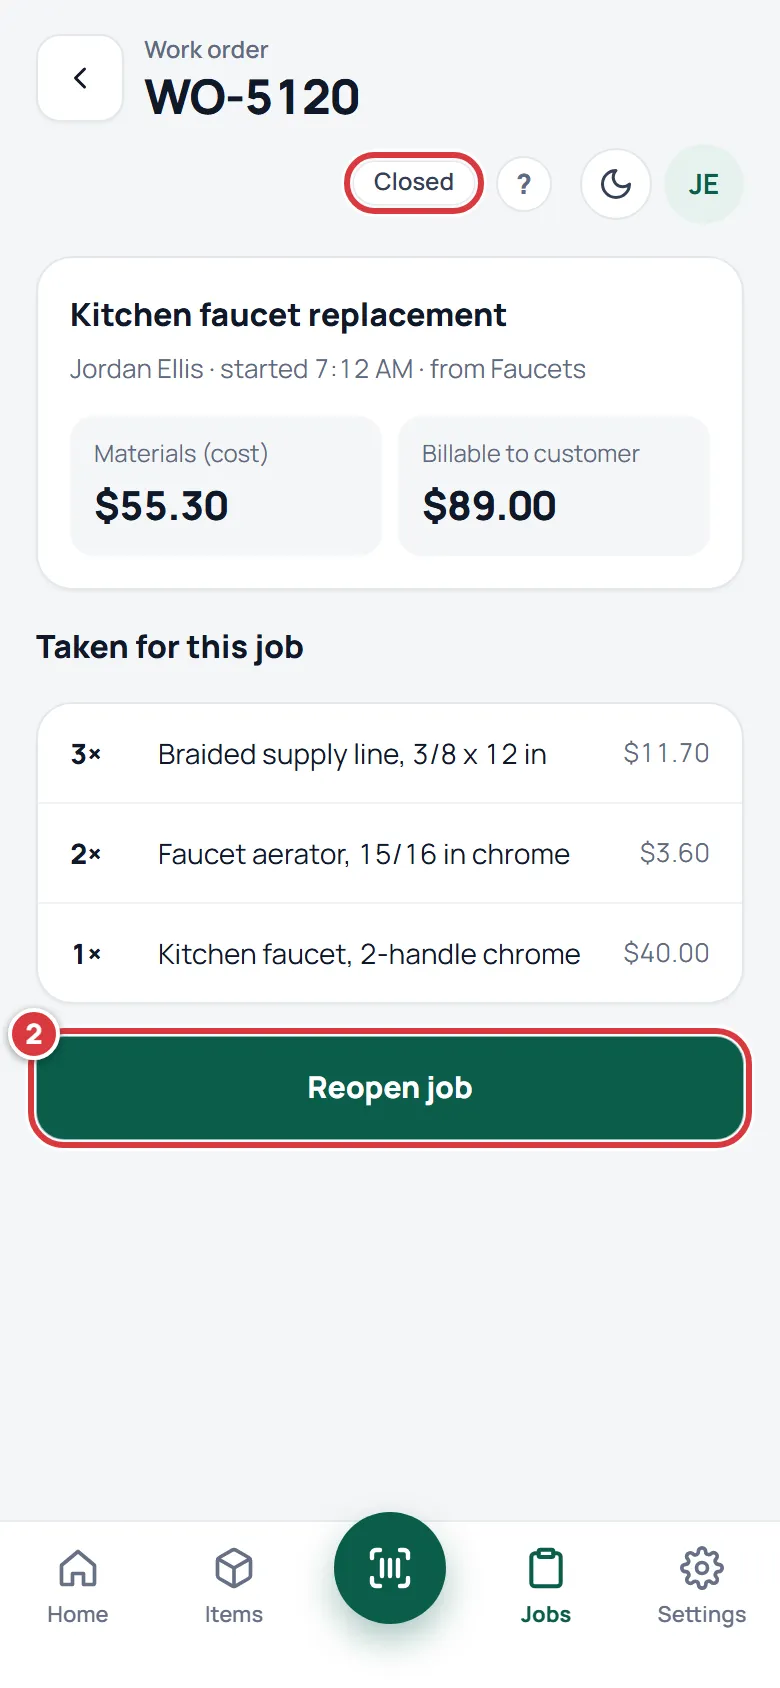
Only a manager or an owner can reopen a job.
- Tap Jobs, tap Closed, then tap the job.
- Tap Reopen job.
Jobs on a desktop#
The Jobs screen on a desktop is the same screen beside the sidebar. A manager or owner sees the same parts, the same cost and the same buttons.
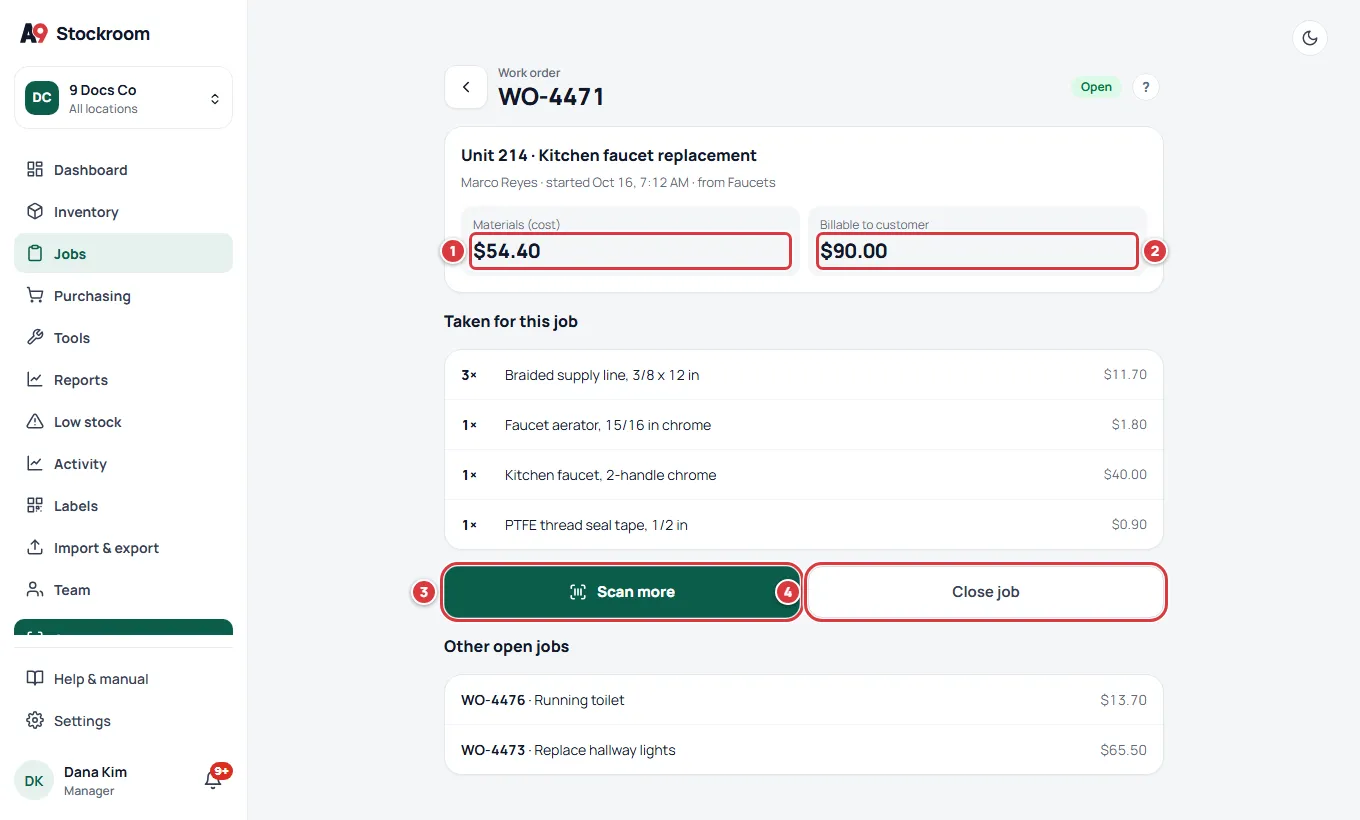
What you'll see#
- After Start job, the job opens with the Open label, the reference at the top, and Nothing taken yet.
- In the scanner, the chip at the top shows the job's reference and a green dot. The big button reads "Take 1 for" and the job.
- After a take, a short message says what you took and how many are left. The part shows up under Taken for this job, and Materials (cost) goes up.
- After Close job, a message says "Job closed" and the label changes to Closed.
- In Activity, each part you took for the job carries the job's reference. See Activity and history.
Bill-back totals#
Every part has a Unit cost (what you pay) and, if you set one, a Bill price (what you charge). A manager sets both on the item. See Items.
- Materials (cost) is the quantity of each part, times its unit cost, added up.
- The Billable to box is the quantity of each part, times its bill price, added up. A part with no bill price adds nothing.
Both totals count what was taken, minus what was returned. They update as you take and return.
The wording of the Billable to box comes from your company's word for a location (set in Company settings). If your word is anything except Property, it reads "Billable to customer". If your word is Property, it reads "Billable to tenant". The numbers are the same.
Stockroom adds the totals up for you. It does not send a bill. Managers and owners can see bill-back totals across jobs on Reports.
Unit turns, when your word is Property#
This section is for companies whose word for a location is Property. Nobody else sees a unit turn or a tenant.
A unit turn is the work to get a unit ready for the next tenant: paint, a new lockset, a deep clean. In a company that uses the word Property, Start job has two more things:
- Tap Jobs, then Start job.
- Pick Unit turn as the kind.
- Type the unit's number in Unit, for example 214.
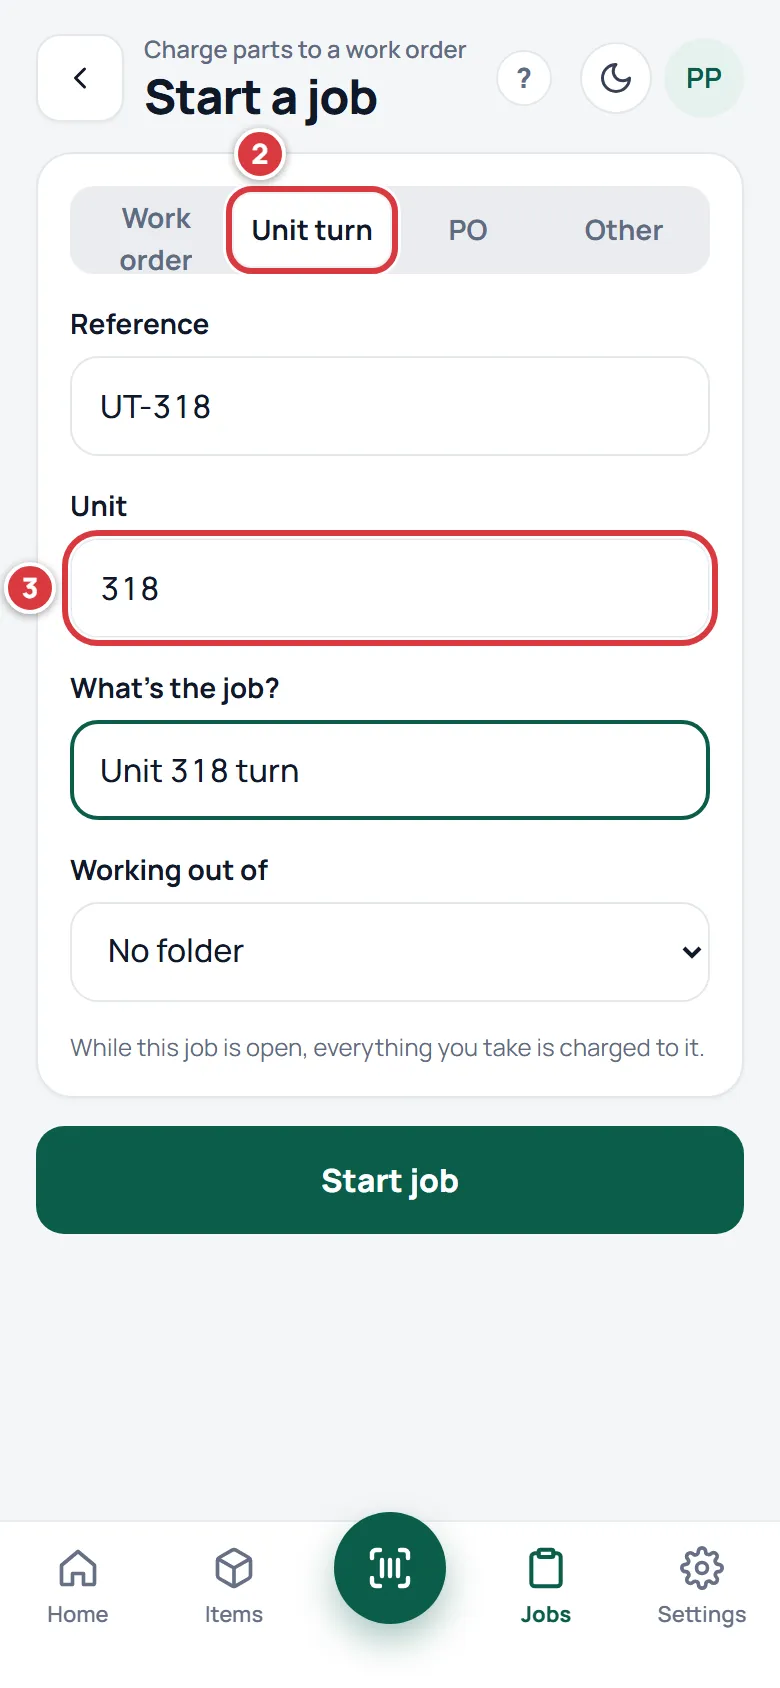
Everything else is the same. The job's top line shows the unit ("Unit 214"), and the box next to the cost reads Billable to "tenant":
- Materials (cost) is what the parts cost.
- Billable to is what you bill the tenant.
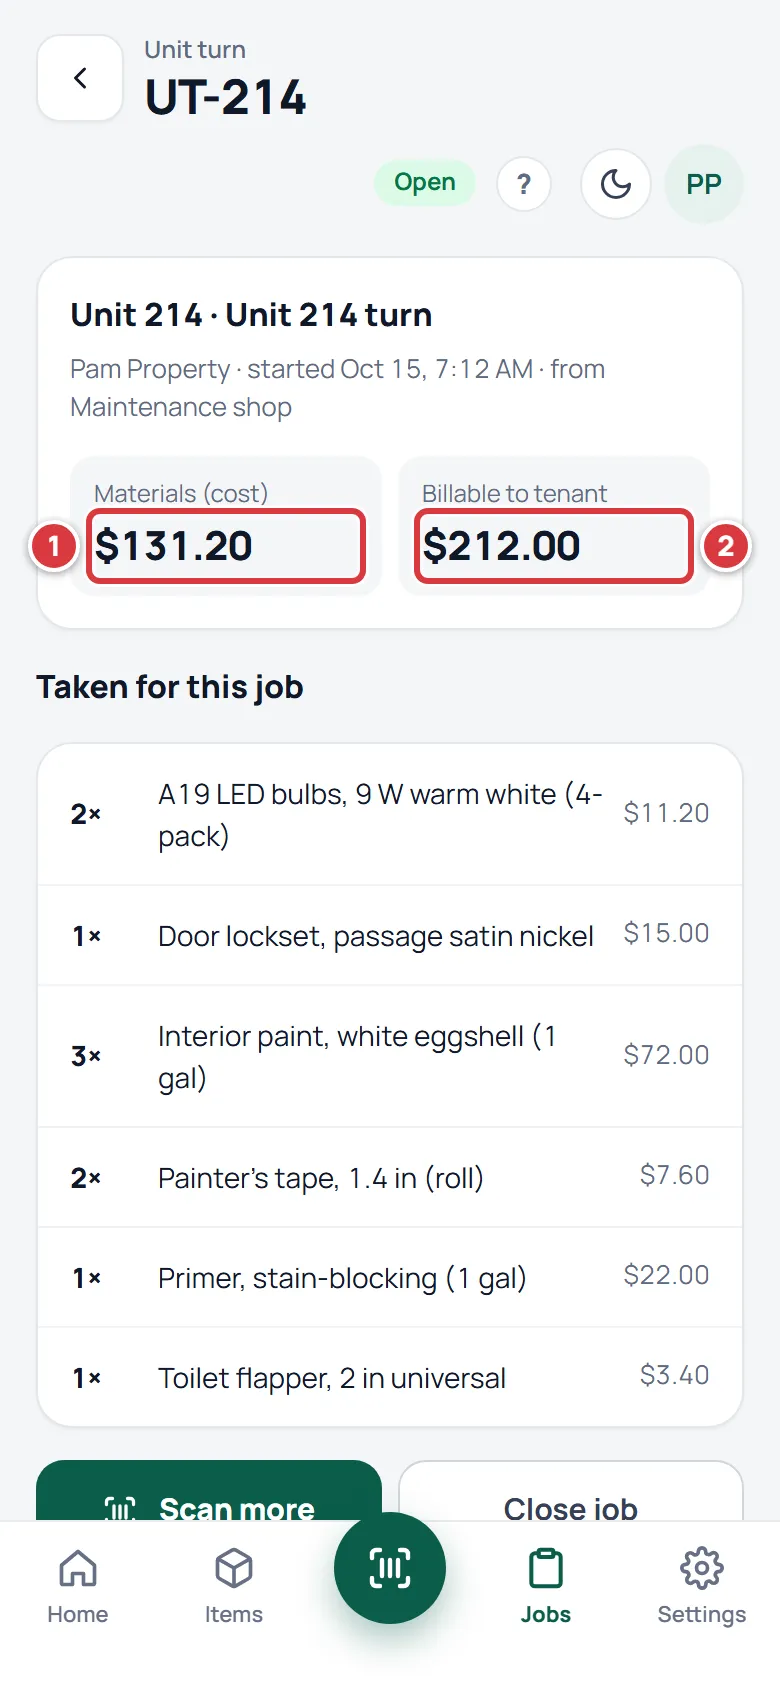
Reports can group spend by unit turn, so you can see what each unit cost to get ready. See Reports.
If it didn't work#
- The Start job button is missing. Your role is Viewer. A viewer can look at jobs but can't start one. Ask a manager or owner to change your role. See Roles and permissions.
- Start job doesn't go through. Check that Reference is filled in. If the screen says "Couldn't start the job", check the reference and try again.
- The scanner chip says No job. You have no open job that you started. A job someone else started is not yours. Start your own job, or use Take for a job on the item screen and pick theirs.
- The scanner says the job is closed. Someone closed the job. Ask a manager or owner to reopen it, or start a new job and take again.
- I took a part for the wrong job. Return the part from the item screen, picking the wrong job in Job. Then take it again for the right job.
- There is no Reopen job button. Only managers and owners can reopen a job. Ask one of them.
- The cost is $0.00 but I took parts. The part has no unit cost. Ask a manager to add one on the item. The billable amount is $0.00 when a part has no bill price.
- My change shows Pending sync. You were offline. It sends when the signal is back. See Fix a change that didn't sync.