Items
Add an item, fill in every field, edit it, mark a tool, add it from a scanned barcode, and archive it when you stop stocking it.
An item is one kind of thing you stock: a toilet flapper, a box of wire nuts, a drill. You make the item once. After that, the stock of it lives in folders, and everyone takes, returns and counts it from the item screen or the scanner. Only owners and managers add and edit items.
What you'll need#
- The Owner or Manager role. Techs and viewers see Managers add and edit items instead of the form. See Roles and permissions.
- A name for the item. It is the only field you must fill in.
- To record stock as you add the item: a folder to put it in. See Folders.
- To make the item a tool: the Pro plan. See Your plan.
- A signal. The item form needs a connection; scanning, taking and returning do not. See Working without signal.
Steps#
Add an item#
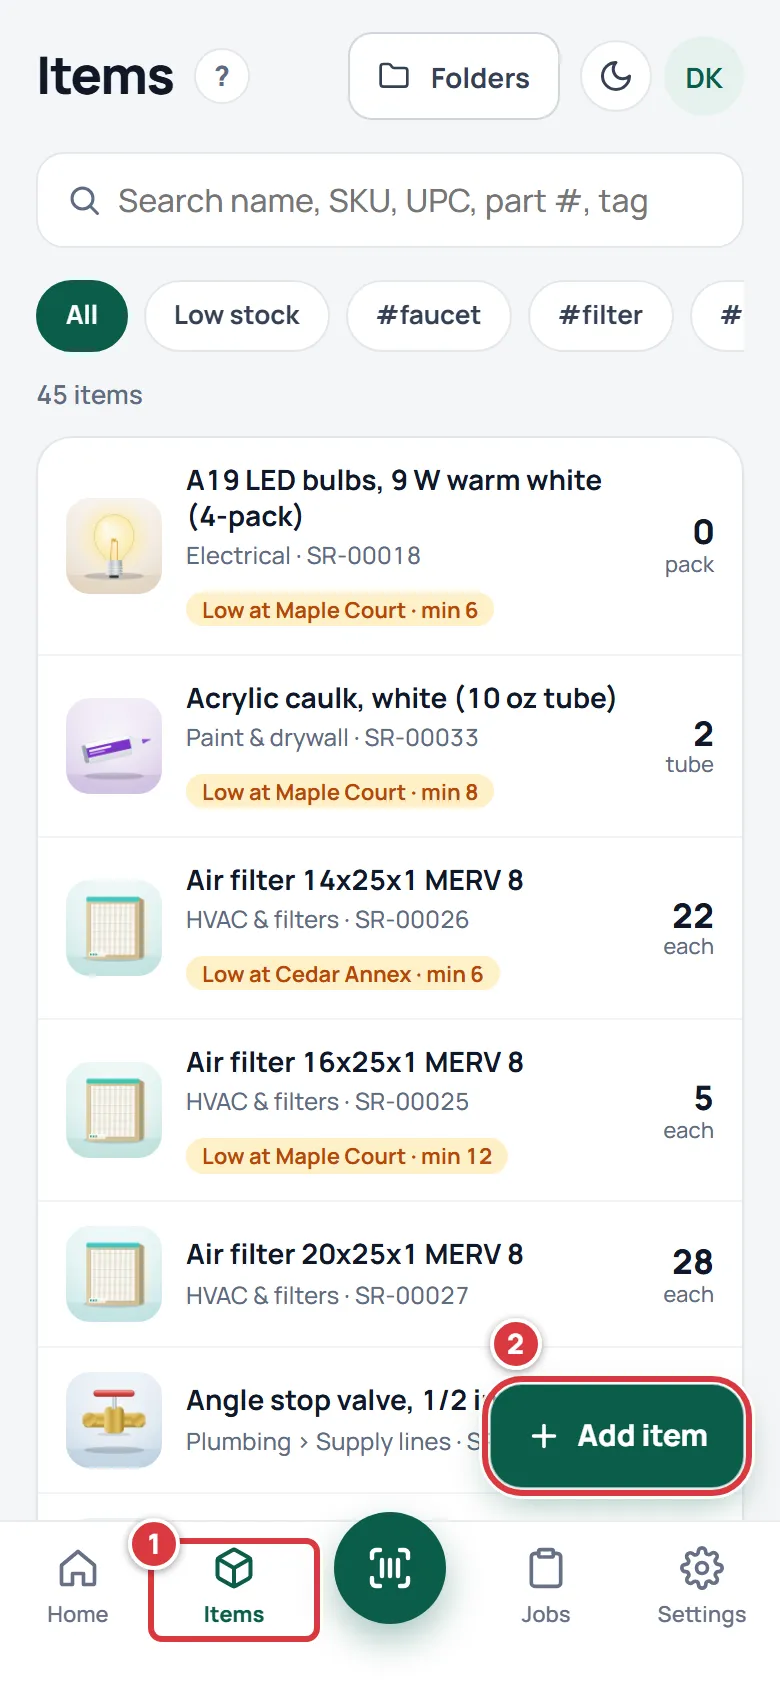
- Tap Items at the bottom of the screen. On a computer, click Inventory in the left menu.
- Tap Add item.
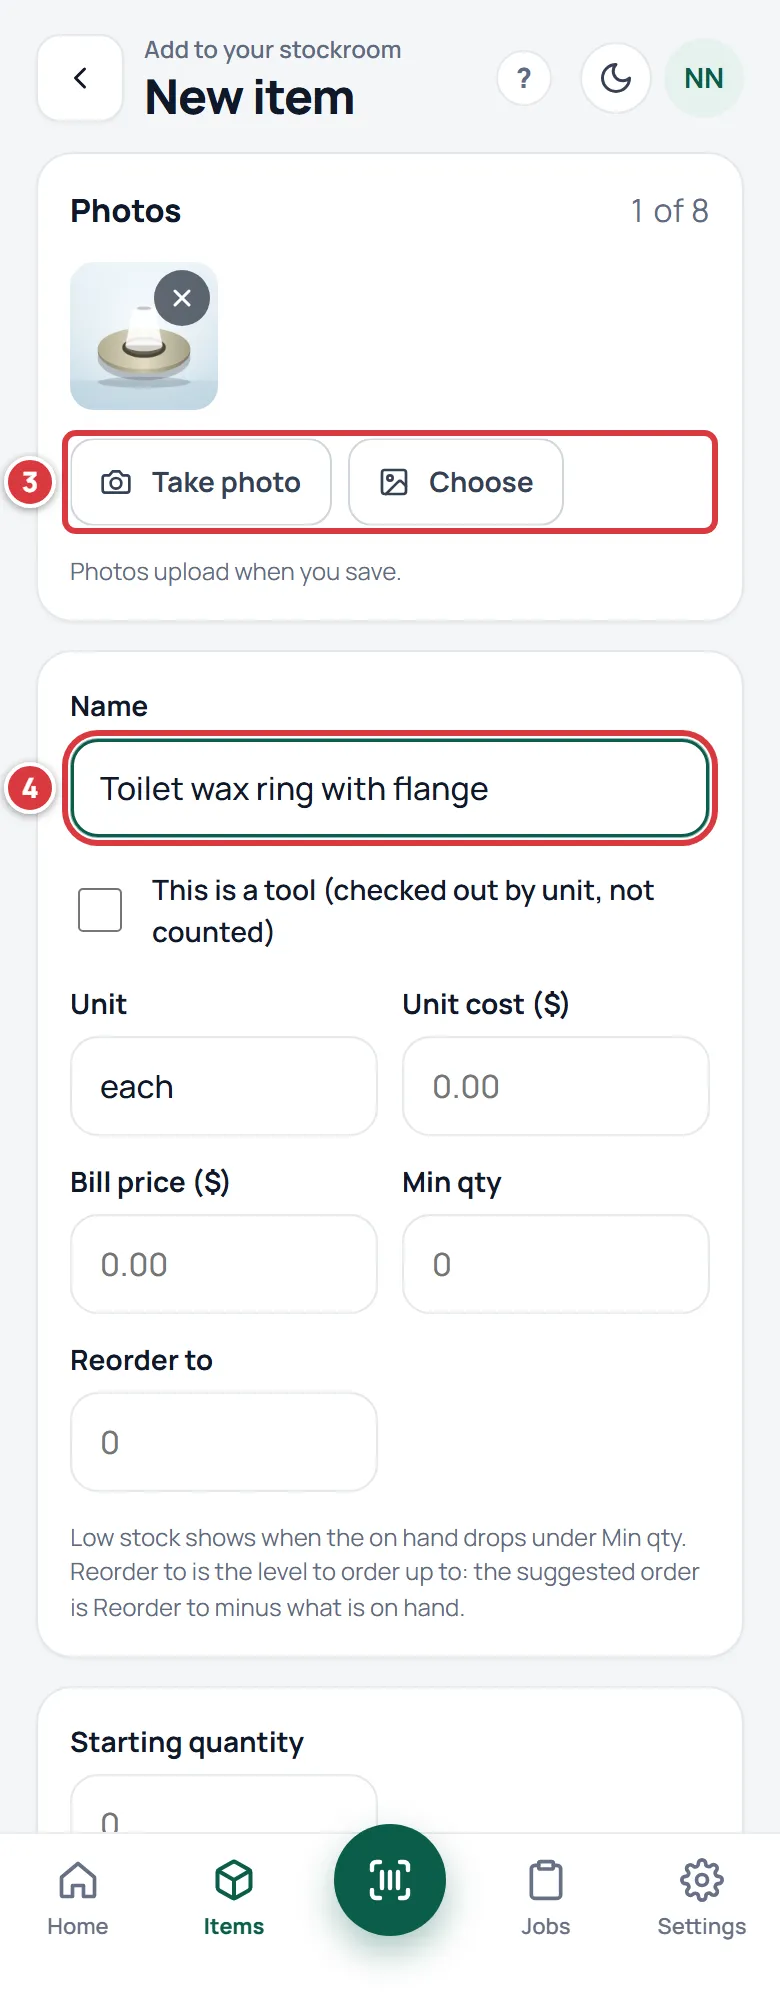
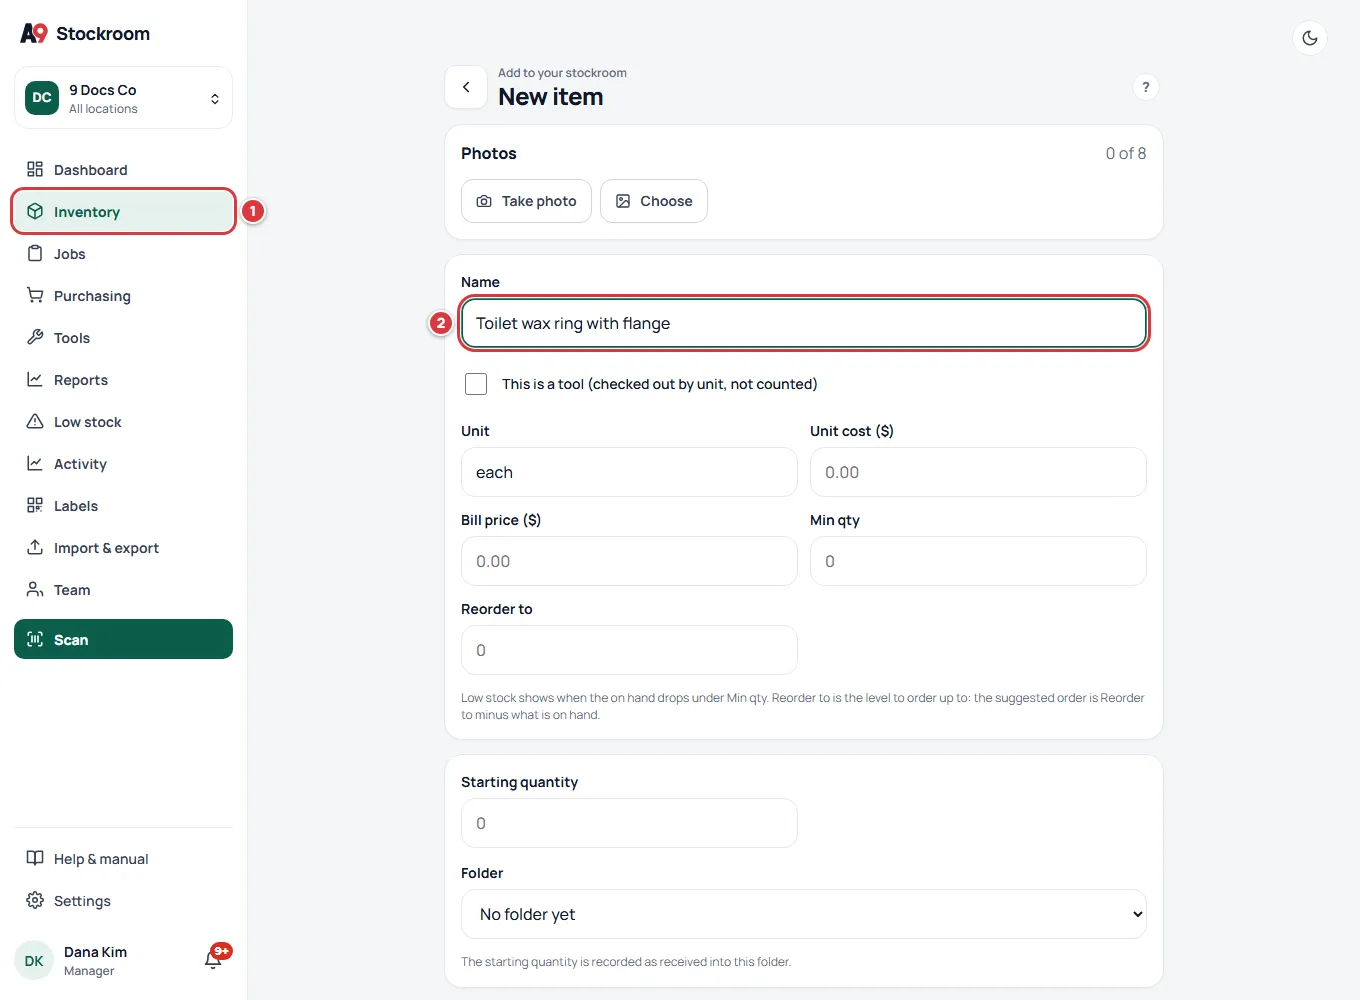
- To add a photo, tap Take photo to use the camera, or Choose to pick a picture from your phone. You can skip this and add photos later.
- Type the Name, for example "Toilet wax ring with flange".
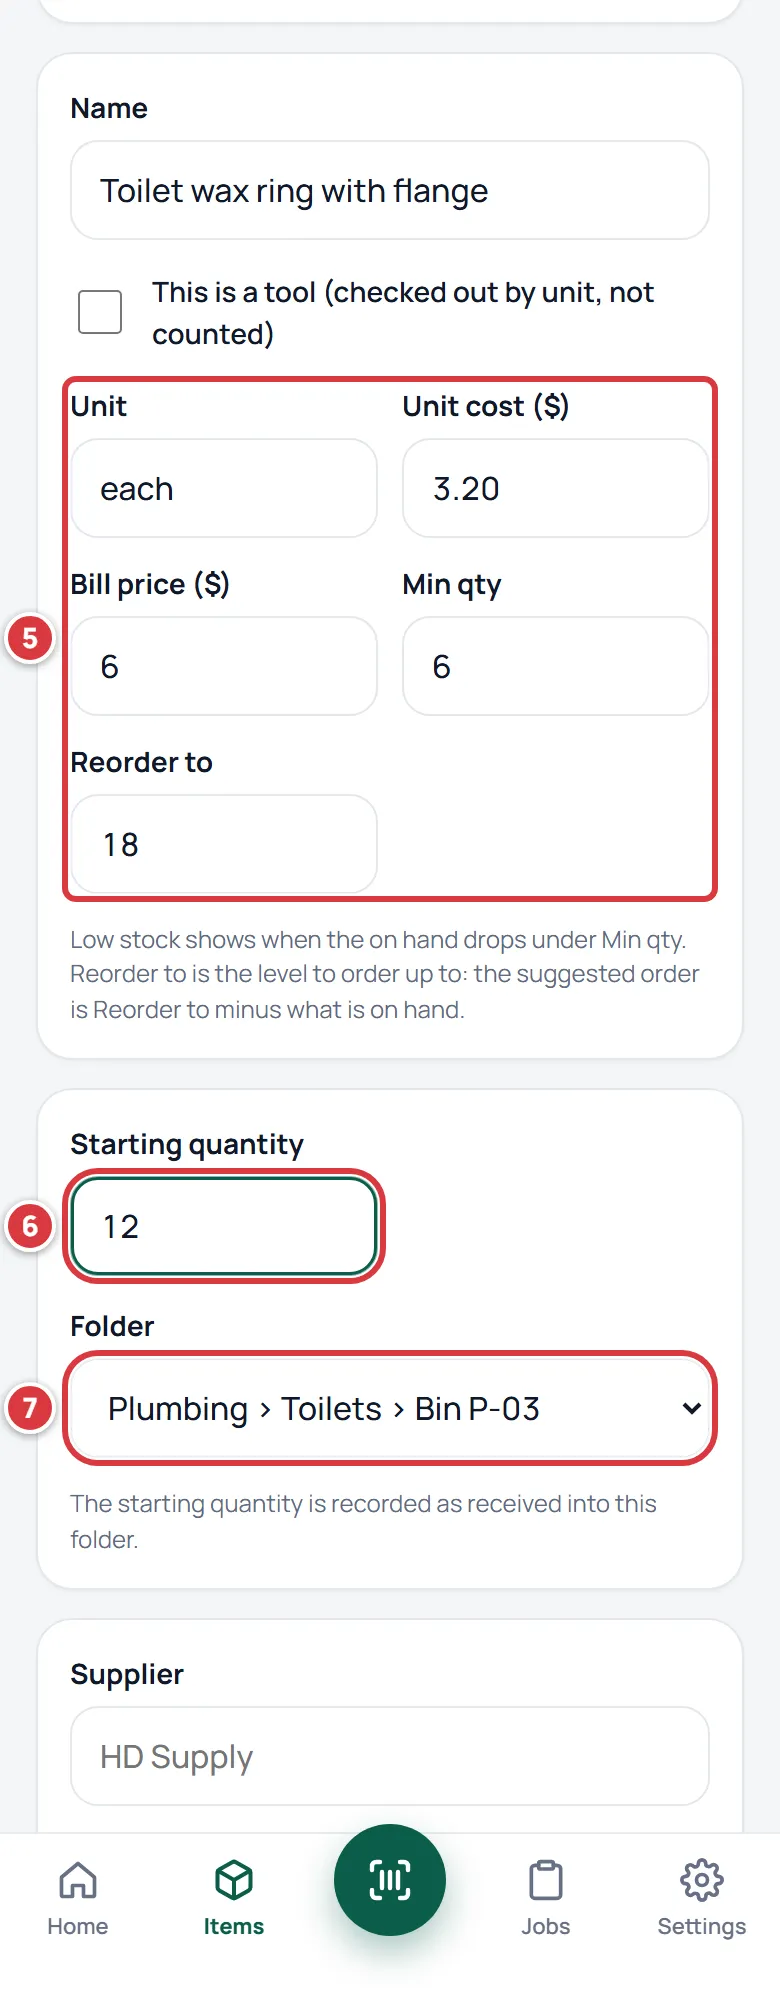
- Set the numbers: Unit (what you count in, like each, box or roll), Unit cost ($), Bill price ($), Min qty and Reorder to. Leave any of them empty to skip it.
- If some are already on the shelf, type how many in Starting quantity.
- Choose the Folder they are in. You must choose one when the starting quantity is more than zero.
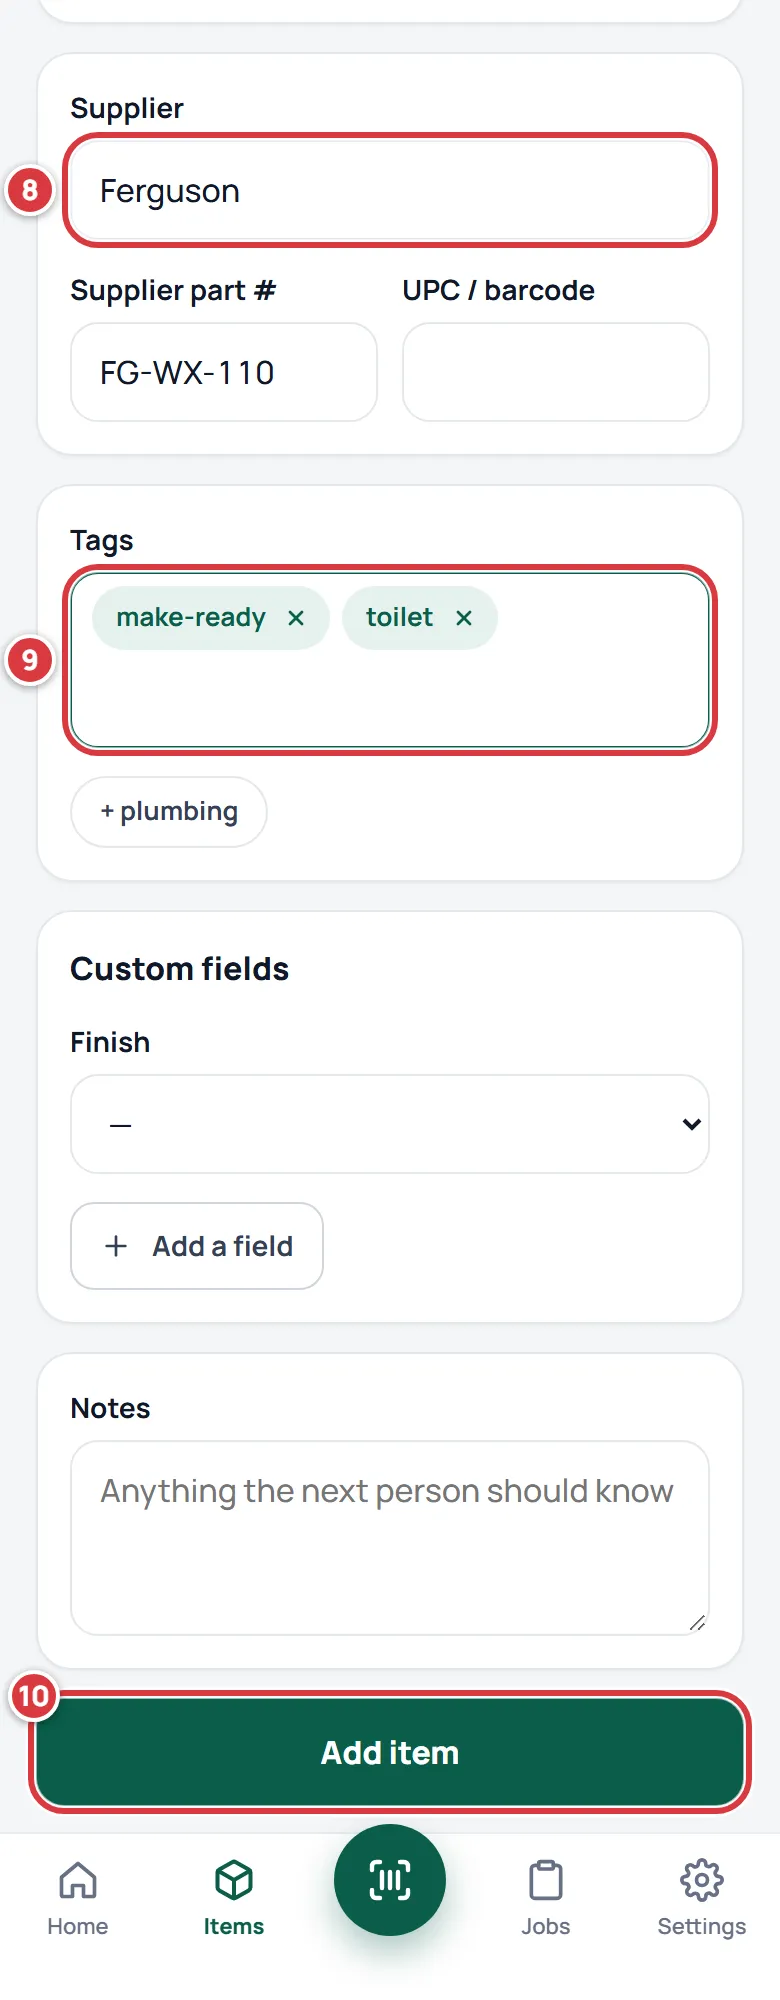
- Fill in Supplier, and if you know them Supplier part # and UPC / barcode.
- Add Tags if you want them. Type a word and press Enter, or tap a suggestion.
- Tap Add item.
The new item opens. Its photos upload as it saves.
Add an item from a scanned barcode#
If a part has a barcode that A9 Stockroom has never seen, you can start the new item from the scan.
Tap the round scan button at the bottom of the screen. On a computer, click Scan in the left menu. Point the camera at the barcode. Then:
- If the code is not on any item, a sheet says No item with this barcode and shows the number. Tap Add a new item from this barcode.
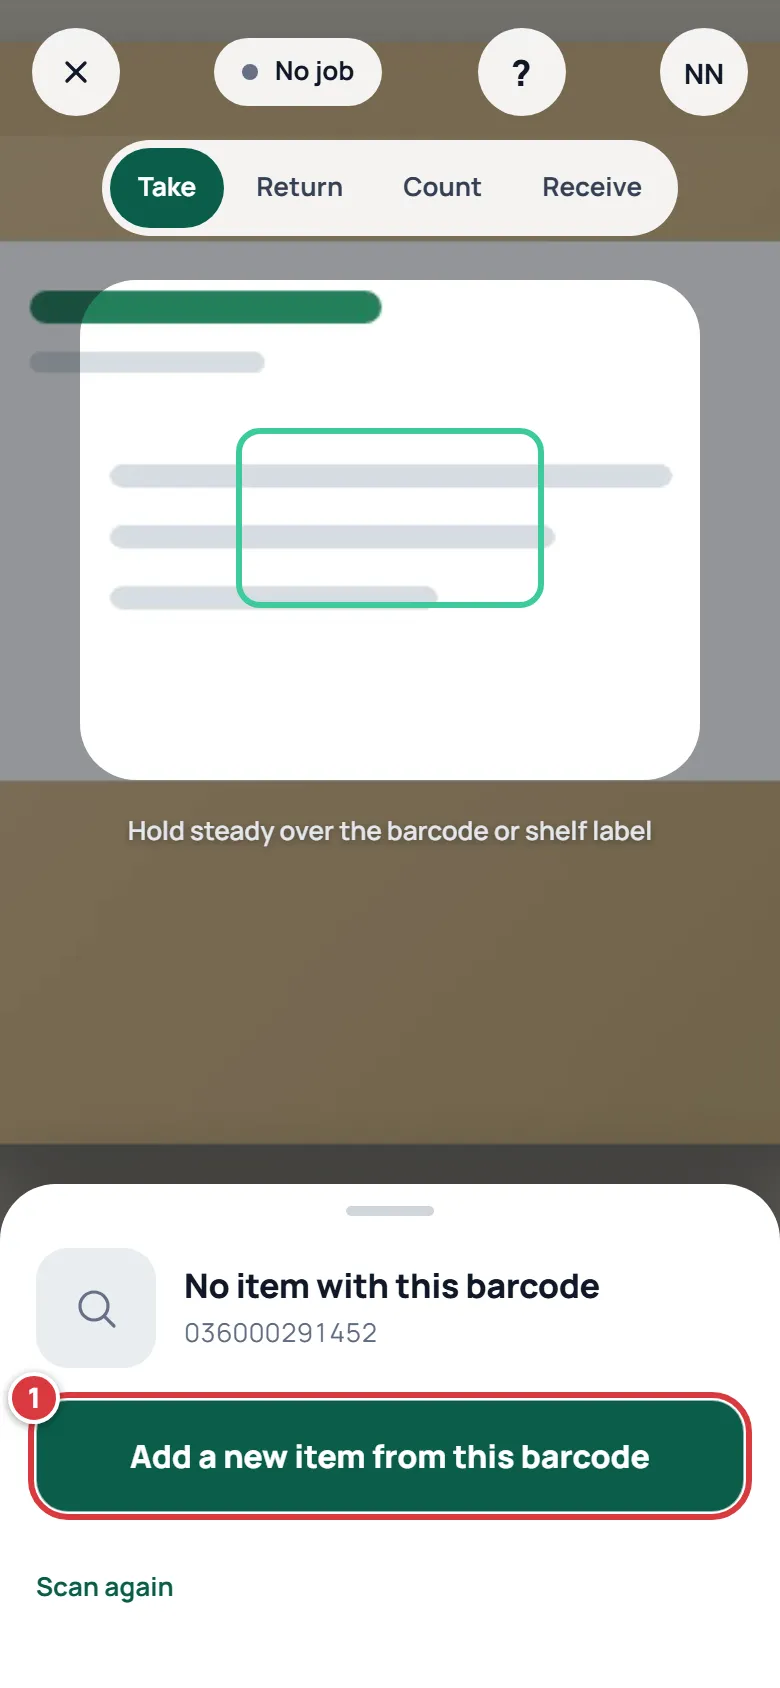
- The form opens with the number already in UPC / barcode. Type the Name, fill in the rest the same way as above, and tap Add item.
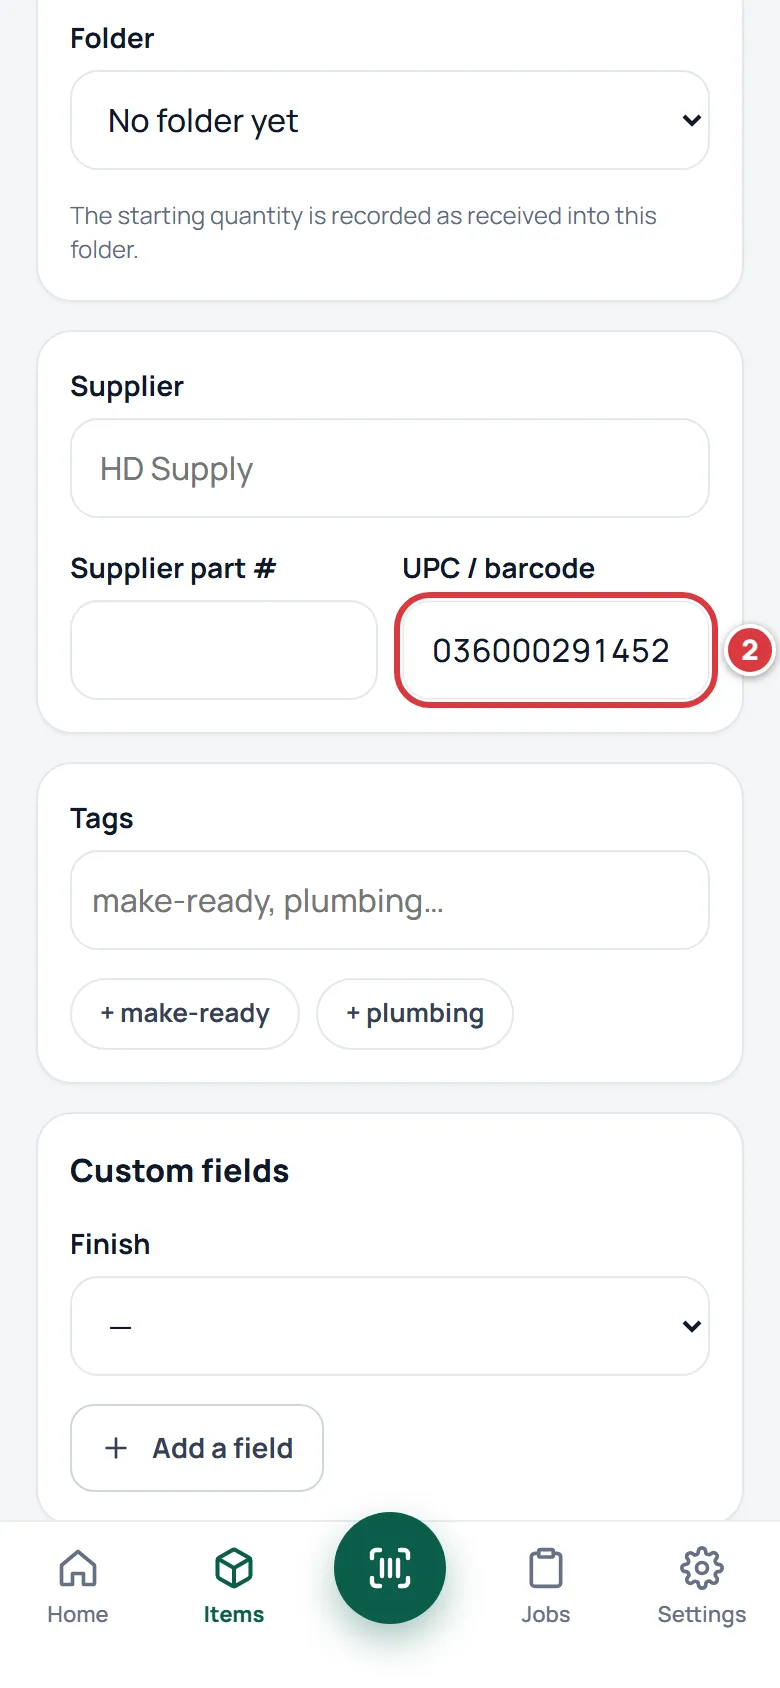
Next time anyone scans that barcode, the scanner finds this item. See Scanning.
Edit an item#
Open the item. Find it with Items, or scan its label. Then:
- Tap Edit at the top right of the photo.
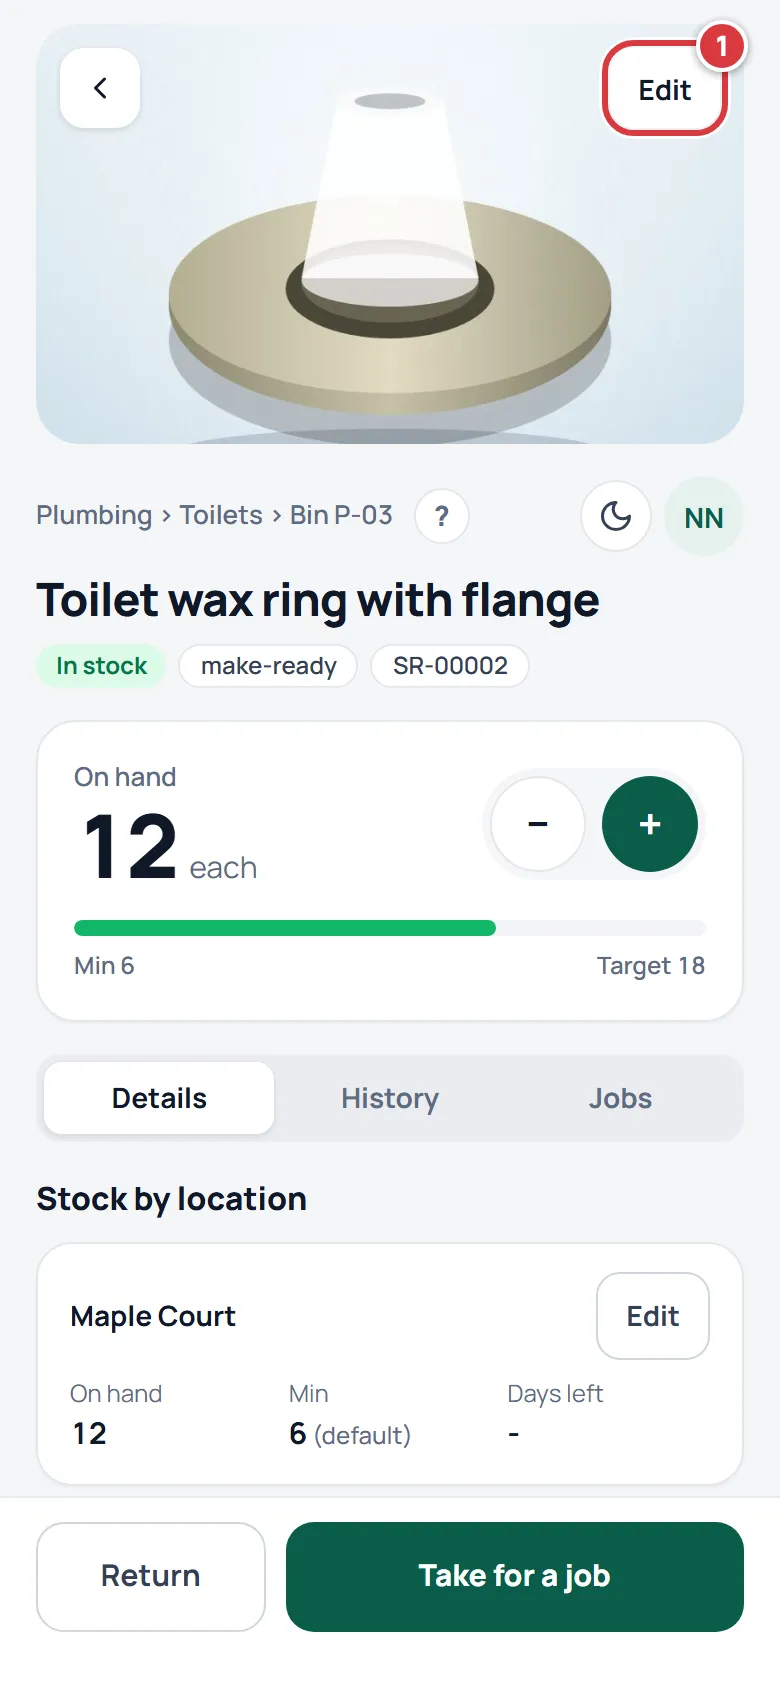
- Change what you need, then tap Save changes. The form is the same as for a new item, except there is no Starting quantity or Folder: change how many you have with Receive, Count and the other buttons on the item screen. See Counting stock and Receiving stock.
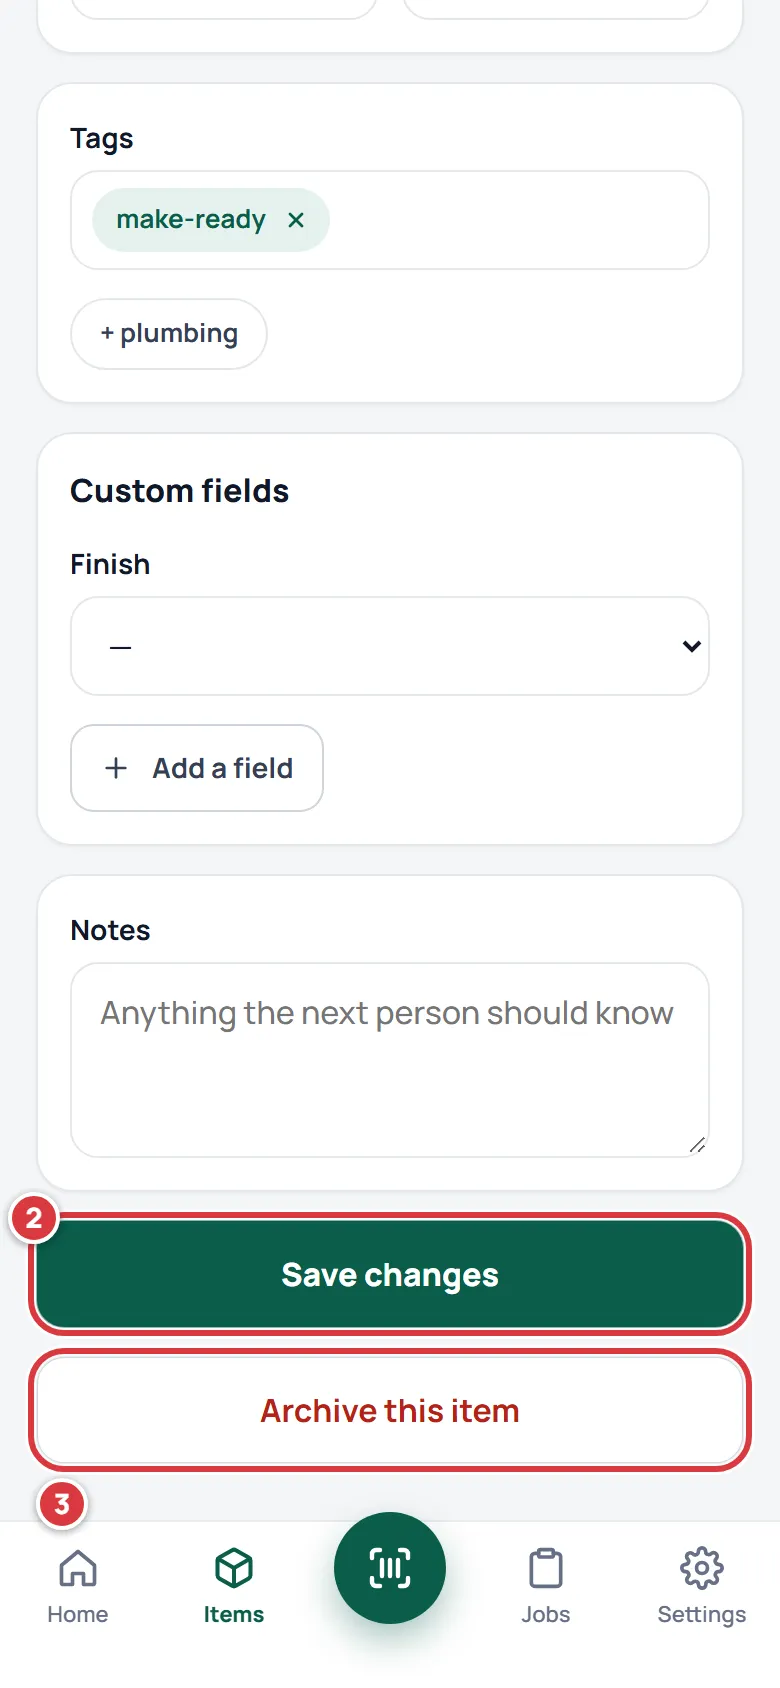
Photos you add or delete while editing are saved straight away. Everything else is saved when you tap Save changes.
Make an item a tool#
A tool is checked out to a person and checked back in. It is not counted. The tool box only appears on the Pro plan.
Start a new item, or edit one. Then:
- Tick This is a tool (checked out by unit, not counted).
- Read the note that appears. The Min qty, Reorder to and starting quantity boxes go away. Save the item.
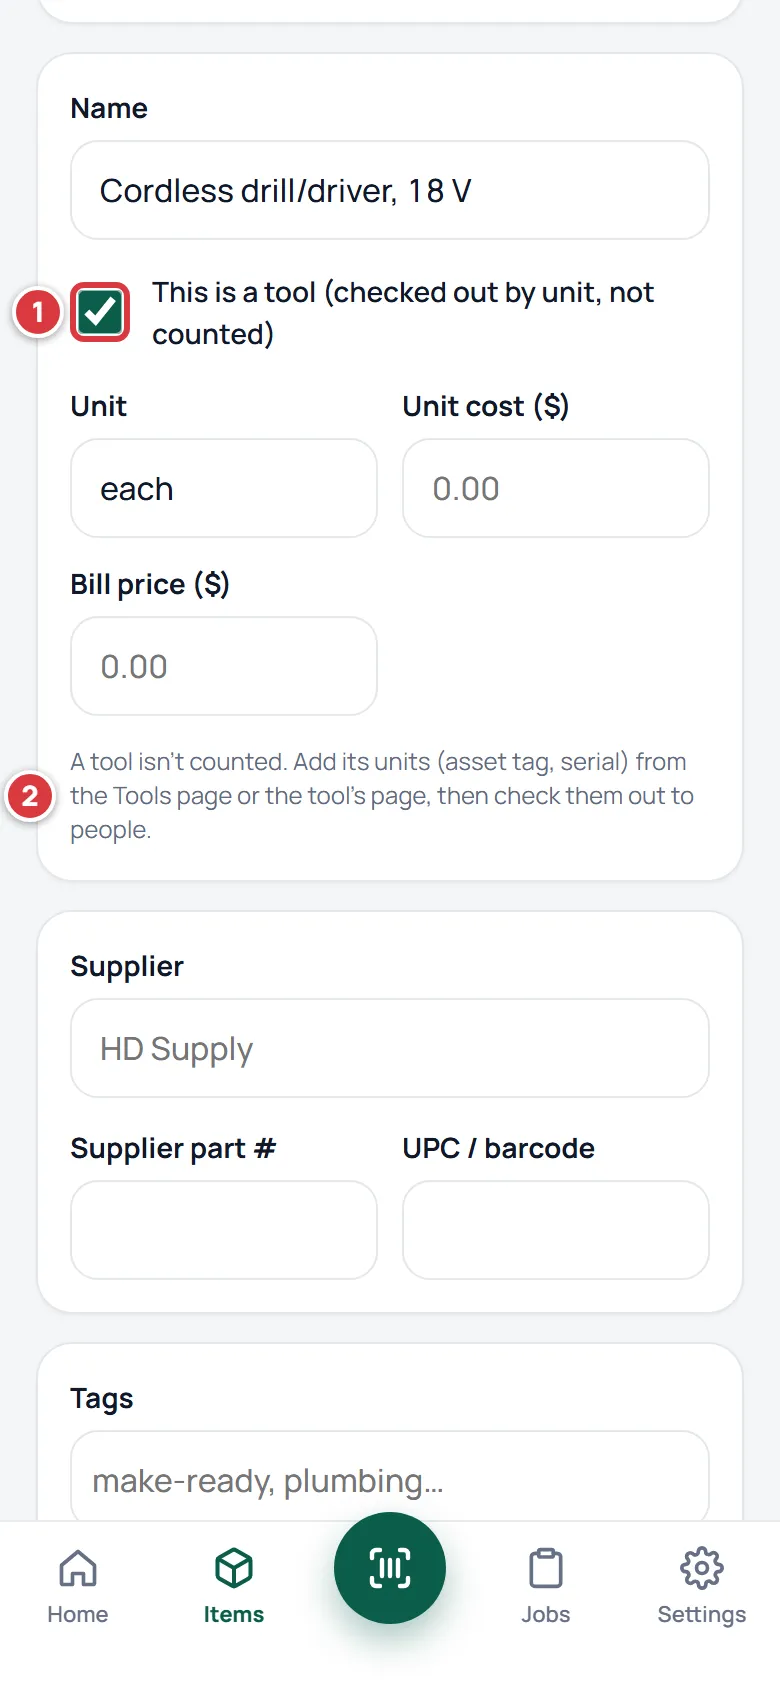
Then add each real tool as a unit with its own asset tag, and check it out to people. See Tools.
Add a custom field#
A custom field is an extra box on every item: a finish, a voltage, a colour. You make it once and it shows on every item's form.
Open the form for a new item or an existing one, scroll to Custom fields and tap Add a field. Then:
- Type the Field name.
- Choose the Type: Text, Number, Date or Choose from a list. For a list, type the options in Choices (comma separated).
- Tap Add field.
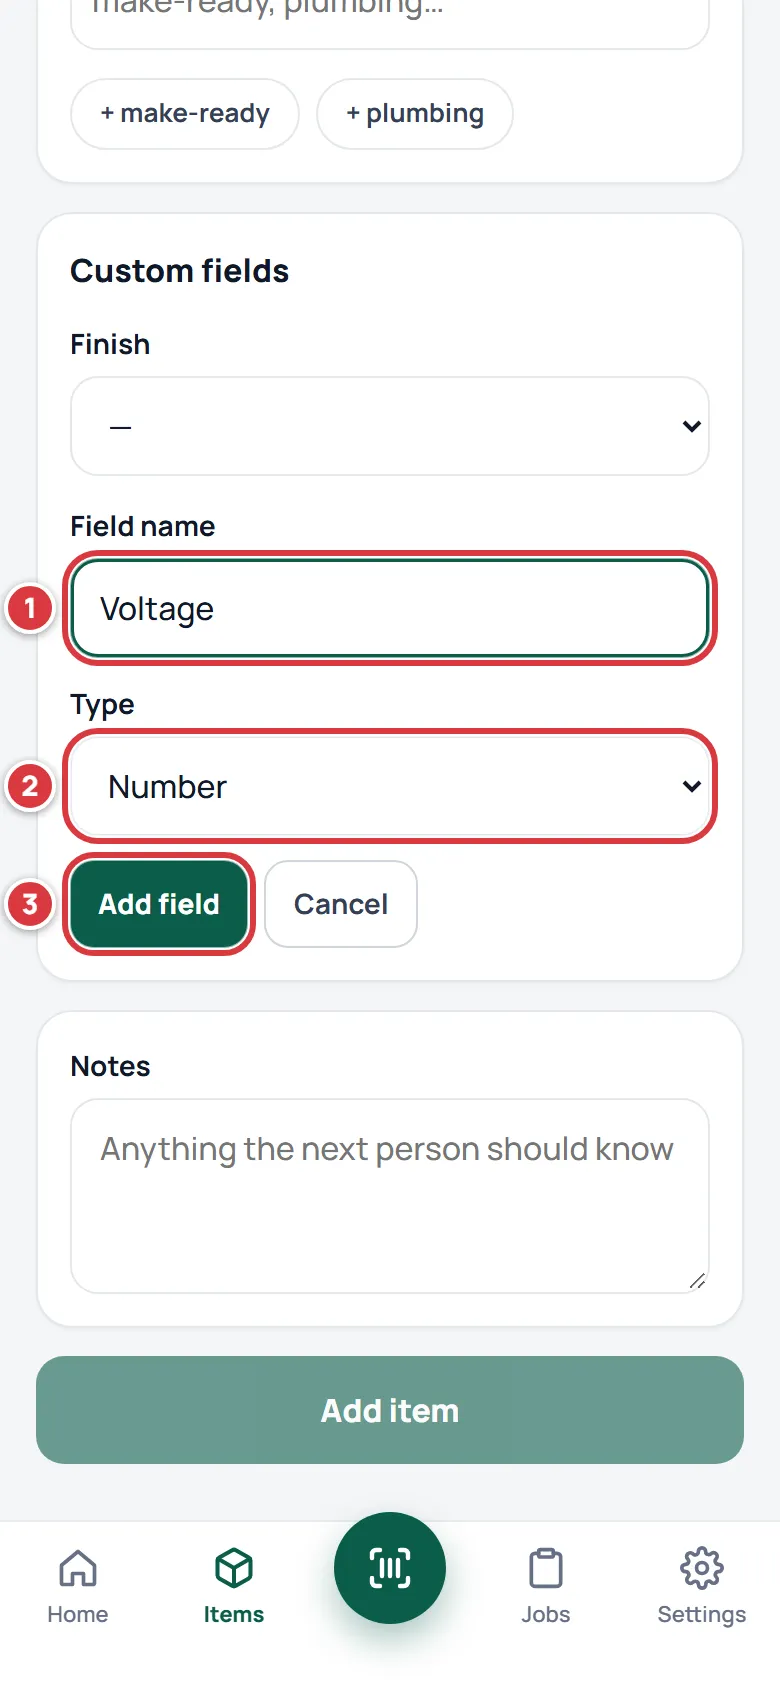
The new field shows up in the form. Fill it in on each item that needs it. A value you fill in shows on the item screen under Details.
Delete an item: archive it#
There is no delete button. Archive an item you no longer stock. It disappears from lists and search. Its history stays.
- Open the item and tap Edit.
- Scroll to the bottom of the form.
- Tap Archive this item.
- Read the message and tap Archive item.
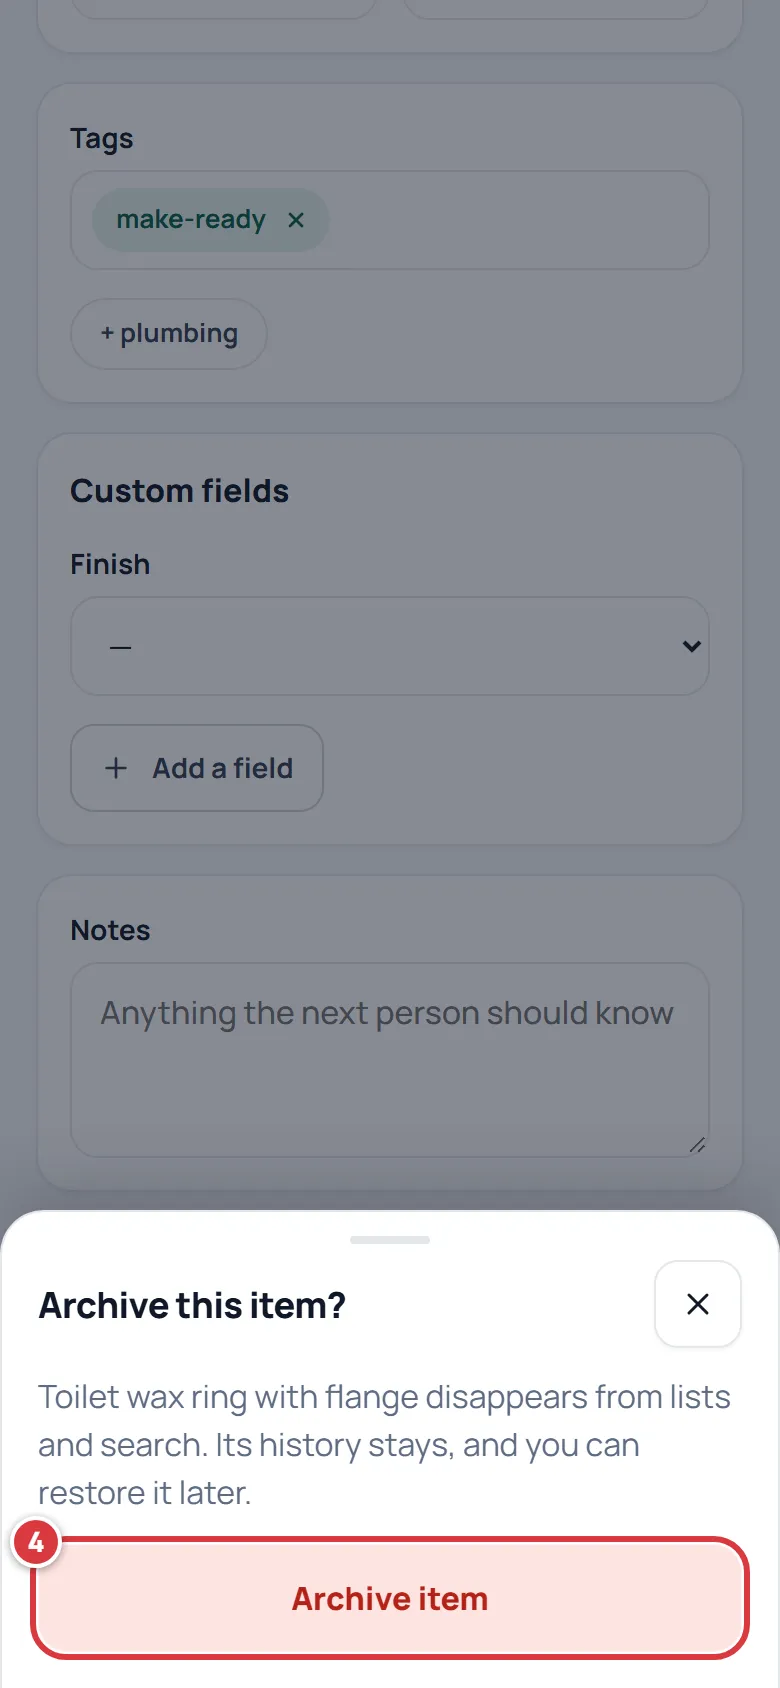
The screen goes back to the Items list. The item is no longer in it.
Bring an archived item back#
An archived item is not in the Items list, but you can still reach it by its label or code.
- Tap the scan button.
- Scan the item's label, or type its SKU in the box under the camera and tap Find.
- Tap the item's name in the sheet to open it.
- Tap Edit.
- Scroll to the bottom of the form and tap Restore this item.
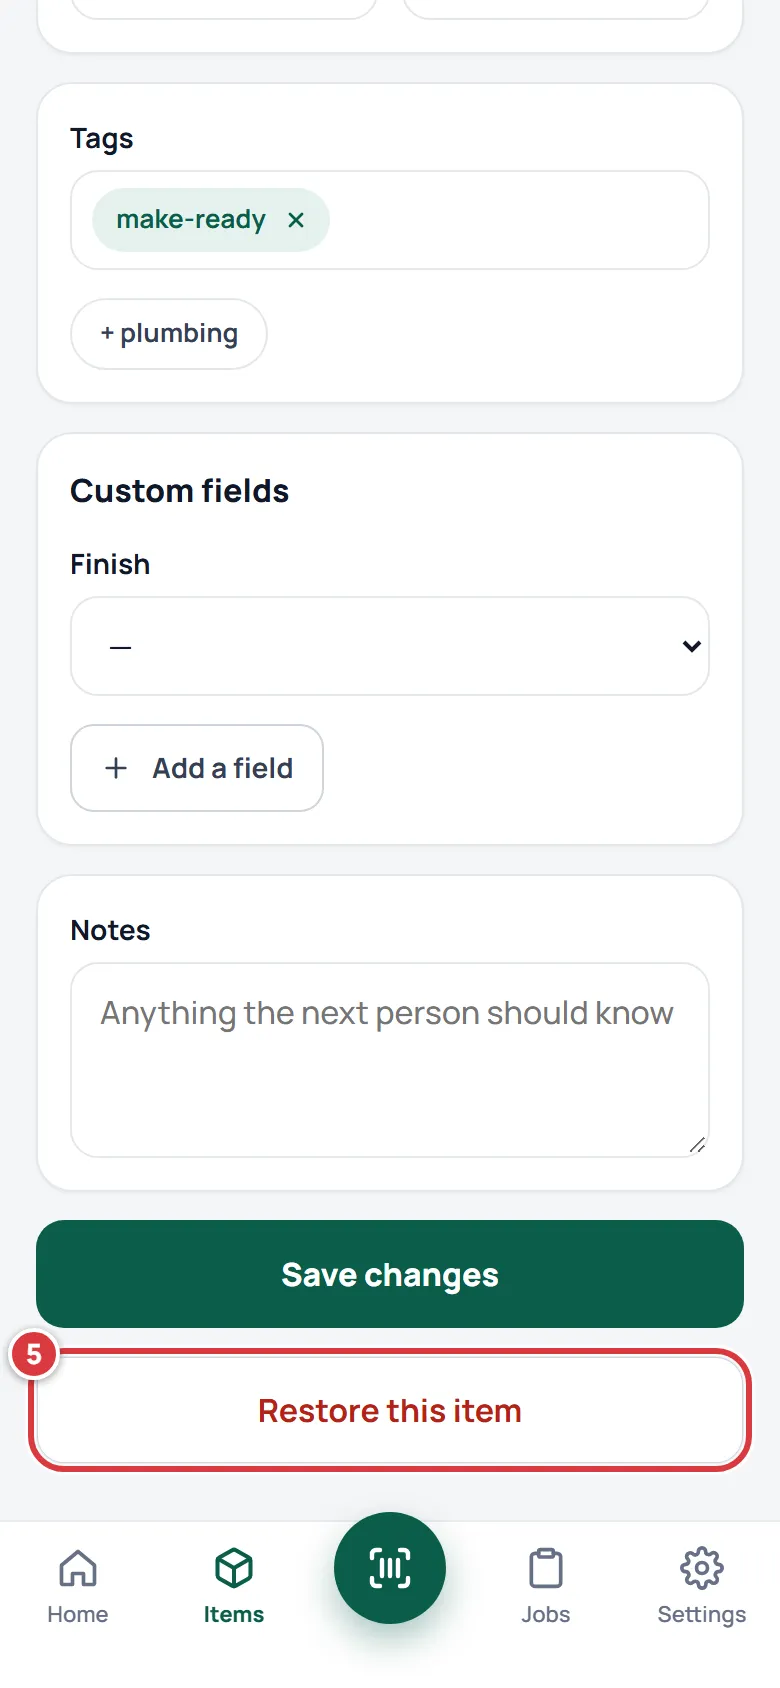
The item is back in the list, with its history.
On a computer#
The form is the same on a computer. Click Inventory in the left menu, then Add item. The menu stays on the left and the form sits in the middle of the page.
What you'll see#
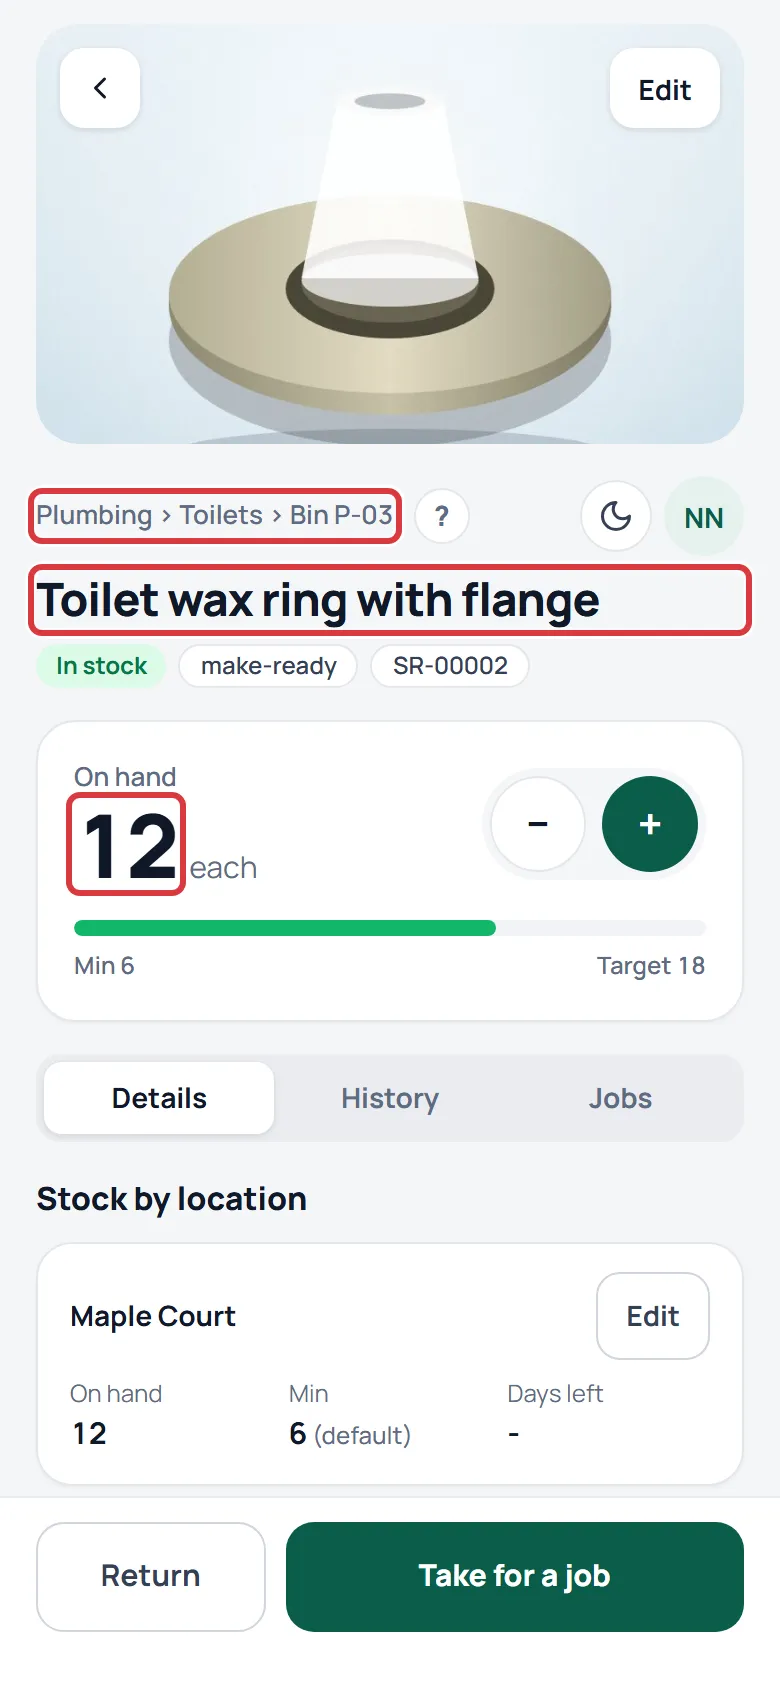
- After Add item, the new item opens. Its name is at the top, with the folder path above it. If you gave a starting quantity, On hand shows that number, and the pill says In stock.
- The small code beside the tags, like SR-00002, is the SKU. A9 Stockroom makes it and you cannot change it.
- Under Stock by location, each location shows its own line. See Minimums and reordering.
- Under Details, the unit cost, bill price, supplier, supplier part, UPC and any custom fields you filled in are listed. The label with a QR code is at the bottom, ready to print. See Labels and printing.
- The starting quantity is recorded as a receive, so it appears under History.
Every field explained#
Fields are in the order they appear on the form.
| Field | What it is |
|---|---|
| Photos | Up to 8 pictures. The first one is the item's main picture. On a new item they upload when you save. See Photos. |
| Name | What people search for and see in lists. Required. |
| This is a tool (checked out by unit, not counted) | Turns the item into a tool. Pro only. See Make an item a tool. |
| Unit | What you count it in: each, box, roll, pair, gallon. It shows next to every count. If you leave it empty it becomes "each". |
| Unit cost ($) | What you pay for one. It prices your stock on Home and on each folder, what a job costs, and the starting price on a purchase order. Cents are fine. |
| Bill price ($) | What you charge for one when a job's parts are billed back. Leave it empty if you do not bill parts. See Bill-back totals. |
| Min qty | The lowest number you want on the shelf. When the stock is under it the item is low and shows on Low stock. Whole numbers. Empty or zero means never low. This is the item's default; each location can set its own. See Minimums and reordering. |
| Reorder to | The number you want to be back at when you order. The suggested order is this number minus what is on hand. Whole numbers. |
| Starting quantity | New items only. How many you have right now. It is saved as a receive into the Folder you choose. |
| Folder | New items only. Where the starting quantity sits. The folder decides the location: the list shows folder names only, not the location each belongs to, so after you save, check Stock by location on the new item to see where the stock landed. See Folders. |
| Supplier | Who you buy it from. Type a name. If the supplier is new, it is added to your suppliers for you; if the name matches one you have, the item is linked to it. Empty means no supplier. See Suppliers. |
| Supplier part # | The supplier's own number for it. Scanning and search find the item by it. |
| UPC / barcode | The number printed under the product's barcode. Scanning that barcode finds the item. |
| Tags | Short words to group items, like make-ready or plumbing. Type a word and press Enter or a comma. Tags are lower case and the # is added for you. Each tag becomes a filter chip on the Items screen. |
| Custom fields | Boxes you add yourself. See Add a custom field. |
| Notes | Anything the next person should know. |
The SKU is not on the list because you do not type it. A9 Stockroom gives every item the next number in your company.
If it didn't work#
The Add item button is grey#
It needs a Name. It also waits while a photo is still being prepared.
It says to pick the folder for the starting quantity#
You typed a Starting quantity but left Folder on "No folder yet". Choose a folder, or clear the quantity.
It says "That didn't save"#
The usual cause is a decimal in Min qty, Reorder to or Starting quantity: they take whole numbers. Costs and prices must be zero or more. Fix the box and tap the button again.
The tool box is not there#
Tools are part of the Pro plan. On Essentials the box is hidden. See Your plan.
A photo did not upload#
On a new item, the item itself is saved and a message says how many photos did not go up, with an Open the item button. Open the item, tap Edit and add them again. A message that says "Up to" a number of photos means the item already has the most it can hold.
The page says it needs a connection#
The item form needs a signal. Go back online and open it again. Taking and returning stock keep working without one.
The screen says managers add and edit items#
Your role is Tech or Viewer. Ask a manager or an owner.
You archived the wrong item#
Bring it back: see Bring an archived item back.
You cannot find an item you archived#
It is hidden from the list and from search on purpose. Scan its label, or type its SKU in the box under the camera on the scan screen.
Still stuck?#
Write to support@a9stockroom.com.